Friday, October 16, 2009

Extracting Honey

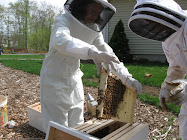
Last Friday was my big moment . . . I had the opportunity to go to a friends house (and fellow bee keeper with 6 hives) to use her extractor just before she extracted honey from 8 honey supers (x10 frames each = 80 frames of honey!) As you would expect, I brought along my camera to document the momentous event . . .

Here is the inside of her very nice electric extractor. A lot of extractors are of the cranking variety - which is a lot better than no extractor. But the electric one sure was nice!

First, you have to remove the wax capping that the bees build on top of each cell filled with aged honey. This was a very small splash of honey on one particular frame, but it's a great picture of removing the cappings. You slide the angled metal comb just under the cappings, lift it off, and dump the gooey piece of wax into a bucket.
Here is my friend Diane helping me with my frames.
Using this comb like cappings remover is slow business, but it generally damages the comb that the bees build the least. There are heated knives and slicer things that you can use, but they cut into the comb more than this small hand-held number.
And, here I am!
Diane had everything set up nicely. As a bee keeper in her 5th year, she has gotten this project down to a science. The plastic sheeting was a great idea. She also put some pieces of cardboard down on the ground between the table and the extractor to catch drips. If you don't put some effort into creating a good system, I could see how this would be a HUGE mess! As is was, it was pretty dern sticky!
Here are all of my frames sitting in the extractor. The extractor spins at a high speed, pulling out the honey using centrifugal force. Then, the honey drips down the sides and out through a spigot.

Diane tipped the extractor when it was done spinning to get all of the honey to pour out of the spigot and into my bucket. I used a strainer this year, but next year I may try making the raw honey that is not strained -- and then is creamed in some way. At least I'll try to do some that way. That honey is supposed to be even better for you.
Look at all of that honey! When it was all said and done, I ended up with about 1/3 of a 5 gallon bucket worth of honey. This will have to last me through July of next year. With all of the baking I do with honey, my granola, yogurt and tea I will probably end up buying some in the end. But, my harvest wasn't bad considering I had two swarms this year!

Wednesday, October 14, 2009

Hen Bliss

I can't imagine there is a better day in keeping hens than the day you find the first egg. After 21 long weeks, our moment finally arrived! A wee little egg, found yesterday morning. The first eggs that young hens lay are small. We have plastic Easter eggs in their nesting boxes to encourage the hens to lay there.

For breakfast today we will cook up our lonely egg for the boys and split it. It's gotta be good. I'm hoping.
We had friends visit the other day . . .
and they fell in love with our hens.
Give us an afternoon with your kids . . .
and we'll have them begging for hens of their own!
Incidentally, we received another wee-little-egg today.
Wonderful.

Wednesday, October 7, 2009

Pepper Jelly Recipe

Pepper Jelly is particularly yummy over cream cheese served with crackers, as an appetizer.
You can also mix the cream cheese together with the pepper jelly for a dip.


(I doubled the recipe listed below and used 1/4 pint jars ... so, for example I used 2 sweet bell peppers, etc.,)

1 cup ground sweet bell pepper, approximately 1 large pepper, including juice
2 to 4 T (depending on how hot you want your jelly, I used 4) finely chopped jalapeno peppers (I used cayenne, jalapeno and sereno)
3/4 C cider vinegar
1/2 C water
1/8 t salt
2 T lemon juice
1 box standard powdered pectin (1 3/4 oz)
2 1/2 C sugar

Seed the sweet and hot peppers (chop, then measure) and then throw in a food processor until "ground", put peppers and the juice into a large pan. Add in and stir together: vinegar, water, salt, lemon juice and pectin. Set the heat on medium-high and bring to boiling. THEN add in the 2 1/2 C sugar. Bring again to a full rolling boil that cannot be stirred down; boil hard for 1 minute. Remove from heat, skim froth, stir. Ladle into sterilized (boil 20 minutes) hot (from being sterilized) 1/2 pint jars, leaving 1/4 inch of headroom. Thoroughly wipe sealing rim of jars with fresh paper towel, put on prepared disk lid, and screw the bad down firmly. Process in a covered pasteurizing water bath at 185 degrees for 10 minutes. Remove jars and set on a dry folded towel where they can cool upright and naturally.

Yum. Yum.

Cooking Edamame

Aren't they cute? These are edamame picked fresh from my garden. I made them on Sunday to compliment the Patriots game. They were so yummy. I planted these at some point in August, and they are finally ready for picking -- just in time before the frost comes. Chipmunks apparently love Edamame seedlings, and ate several baby plants. But I ended up with enough to keep me cheerful.
I searched online to see how to cook them. It seemed as though they'd be pretty straight forward, but I just wanted to be sure. My favorite explanation was created by a young Japanese woman on YouTube. She was quiet and simple during the presentation, but the best part was that she had obviously learned to cook from her mother or grandmother using observation instead of time to determine 'doneness', and other tips. She said the way to know if your edamame are done, is by looking to see when the pods crack open slightly. Then, she insisted that to cool them off, don't use cold water as this (apparently) hurts flavor. Rather, she fumbles through a cabinet, and whips out a hand held fan to cool them (like everyone must have fans hiding in their kitchens, at the ready). I thought that was priceless. Of course I've been cooling beans with water, even ice water, for years, but I dutifully used a folded piece of paper to cool my homegrown edamame.

Basically, you put about 1 T salt into a pan of water (filled enough to be sure the beans are covered with water) and bring to a boil. When the water is boiling throw the beans into the water for 4-5 minutes (when the pods start to crack open slightly). Drain. Fan to cool, gently stirring to give them all a chance in front of the fan. Toss with one teaspoon or so of kosher or coarsely ground sea salt. They were so yummy, and I was so proud!

Here is the YouTube link: Kirin's Edamame
Take a look at her modern spice drawers -- I want one!

Thursday, October 1, 2009

Disobedient Hens

Do you remember this?
I do. Victor and I worked our rear-ends off to make a protected area for our little hens.
Don't you know that now as many as five of them at one time hop out (flapping, half climbing up the fence) at will and peck around the yard.
Ahem . . . why did we bother?!
They were hopping out so frequently, and so many of them, that one late afternoon Benjamin and I let them all out figuring they'd stay close to home and come home easily at dusk. Nope. Those hens started trekking deep into the woods like a group of mountaineers beginning a expedition to climb Mount Washington. We had to pull out the stale hot dog buns and have Benjamin and Ripley coral them back towards the yard like sheep dogs -- luring them with crumbs. Bad hens.
To top it all off . . . we have no eggs yet. This is the week they start to lay. We are waiting.
Not too patiently.
Victor is already starting to talk about soup . . . and I don't mean egg drop.
We do have pole beans, harriot verts, dried beans, parsley and tons of arugula though!