Showing posts with label sustainable living. Show all posts

Wednesday, November 4, 2009

Hostile Takeover

I was only able to catch one hen on this swing set on my camera, but there had been five! This shot is from a few weeks ago. Since then I've tried to cut their wings three times, as they'd even gotten into my fenced in garden! Still, every afternoon, I find a few of them roaming around outside of their fencing. So, today I have a neighbor who also has hens and has just successfully trimmed his hens wings, coming over to help me. My hens are out of control. The little whipper-snappers.

However, they have started to give me some good gifts . . .
I don't think my Barred Rocks are laying yet, but my New Hampshire and Rhode Island Reds are just starting. My champion layer so far is my New Hampshire Red, Pearl. Named for her pearlized colored legs -- they are supposed to be yellow at this young age.

Friday, October 16, 2009

Extracting Honey

Last Friday was my big moment . . . I had the opportunity to go to a friends house (and fellow bee keeper with 6 hives) to use her extractor just before she extracted honey from 8 honey supers (x10 frames each = 80 frames of honey!) As you would expect, I brought along my camera to document the momentous event . . .

Here is the inside of her very nice electric extractor. A lot of extractors are of the cranking variety - which is a lot better than no extractor. But the electric one sure was nice!

First, you have to remove the wax capping that the bees build on top of each cell filled with aged honey. This was a very small splash of honey on one particular frame, but it's a great picture of removing the cappings. You slide the angled metal comb just under the cappings, lift it off, and dump the gooey piece of wax into a bucket.
Here is my friend Diane helping me with my frames.
Using this comb like cappings remover is slow business, but it generally damages the comb that the bees build the least. There are heated knives and slicer things that you can use, but they cut into the comb more than this small hand-held number.
And, here I am!
Diane had everything set up nicely. As a bee keeper in her 5th year, she has gotten this project down to a science. The plastic sheeting was a great idea. She also put some pieces of cardboard down on the ground between the table and the extractor to catch drips. If you don't put some effort into creating a good system, I could see how this would be a HUGE mess! As is was, it was pretty dern sticky!
Here are all of my frames sitting in the extractor. The extractor spins at a high speed, pulling out the honey using centrifugal force. Then, the honey drips down the sides and out through a spigot.

Diane tipped the extractor when it was done spinning to get all of the honey to pour out of the spigot and into my bucket. I used a strainer this year, but next year I may try making the raw honey that is not strained -- and then is creamed in some way. At least I'll try to do some that way. That honey is supposed to be even better for you.
Look at all of that honey! When it was all said and done, I ended up with about 1/3 of a 5 gallon bucket worth of honey. This will have to last me through July of next year. With all of the baking I do with honey, my granola, yogurt and tea I will probably end up buying some in the end. But, my harvest wasn't bad considering I had two swarms this year!

Tuesday, June 16, 2009

Garlic Scape Pesto

What on earth is a SCAPE? I didn't know either. And who came up with that name? Anyway, I have them. Scapes are the flower stems that garlic plants produce just before the bulbs mature underground. If you are growing your own garlic, as I am for my first year ever, it is a common practice to cut the scapes off in order to boost the growth of your bulbs. It's wonderful because it is one more thing that you can harvest from your garden at this early point in the season when all there is, is lettuce, peas, strawberries, rhubarb and last fall's kale (which, is not too shabby an assortment, I must say).
Some say to cut your scapes off before they make a full loop, others say wait until they've made two loops. I split it down the middle and trimmed them off after about one loop -- give or take -- and enough to make my first batch ever of Garlic Scape Pesto. Aren't they a bit odd looking?
To make Garlic Scape Pesto, you pretty much follow your favorite basil pesto recipe and in place of the basil, use the scapes. The recipe I adapted from called for a pound of scapes. My first harvest was just shy of that.
Here is the recipe I ended up with:

Before you start, put water on to boil with 1 T of salt.

Garlic Scape Pesto:
1 lb. of garlic scapes, chopped just a little bit so you can cram them into your food processor.
1+ cups of freshly grated Parmesan cheese - first I use the grater attachment, then the attachment that looks like a propeller so the cheese is chopped fine. 
1/4 cup toasted or roasted pine nuts, chopped. I toast them in my toaster oven until lightly browned. My brother (a pesto fanatic) roasts them in a pan over the stove.
2/3 cup extra virgin olive oil, or so. 
Juice of one lemon (I only had 1/2, but it would have been better with a whole.)
Pinch / Dash of cayenne pepper
1/2 t salt, to taste
plenty of freshly ground black pepper
(I didn't have any basil leaves on hand, but if I did I would have added about 1/4 cup of them just to accent the garlic scapes. You would add them at the same time as the scapes.)

If you want, you can dump everything in together and just pulverize until everything is in tiny bits -- it's fast and easy. But, I don't love the way the pine nuts and the Parmesan cheese get pasty when I do that. So, first I grate the cheese, set aside. Chop the pine nuts with a hand chopper, set aside. Put the garlic scapes, lemon juice, cayenne pepper, salt and pepper into the food processor and chop until the scapes are finely minced. Then, slowly drizzle the olive oil into the food processor while it's running. Run the food processor for about 10 seconds. Personally, I like to mix in the Parmesan cheese and pine nuts in by hand (so things don't get pasty), however you may be content to dump them into your food processor pulse it a few times just to combine everything. 

Some folks swear by putting a ladle of pasta water into the pesto before tossing it with your pasta. This makes the pesto stick nicely to the pasta. Sprinkle with Parmesan cheese. 

This makes a good amount of Garlic Scape Pesto. We cooked a pound of pasta and still had some pesto left over. It was delicious. Victor, my food critic, said that it was very good. And then added a few minutes later that it was really, very good! Enjoy.

Thursday, June 4, 2009

Garden & Hen Progress

I was hoping that my garden would be a little more 'in balance' this year, being the second year and all. But, I guess it takes longer. I have bazillions of bugs. And I don't mean the good kind. 

Here is damage done to a Portuguese Pole Bean that I planted. The seedling had wilted, so I picked it, and what did I find? A wireworm. Commonly found in gardens that were formally grass. That would be mine. There is not a whole lot to be done about them, except to pick them out when you see them. 
I also have these black bugs -- flea beetles I think. They eat holes in everything. They particularly love my potato plants, my tomato seedlings, my eggplant seedlings, my cucumber seedlings . . . . yep, pretty much anything that's in my garden. They can apparently be discouraged by soapy water spray. I don't know, it hasn't been that successful. 

I also have tons of tiny (a little smaller than the head of a pin) orange hopping bugs that suck the life out of leaves and seedling stems. Does anyone know what these are?  
Well, speaking of potato plants, here is one of my infamous potato towers. As you can see, I've had to put composted leaves, grass clippings, straw, a little compost around the plant stems several times already. You are supposed to do this every time the plant stems are about six inches or so above the compost. Well, it seems that as soon as you compost, they shoot up another six inches. I have to admit, it's a bit labor intensive. Mainly because my compost piles are still a little lacking since I'm only 1 1/2 years into this journey. Let's just hope I'm growing potatoes in these things! I have a total of 17 of these towers scattered around my back yard. I will be either the coolest gardener on the block, or the laughing stock of my neighborhood and my husbands family. 
My strawberries are starting to ripen. If only we could get several warm sunny days in a row.
Please, enough cold rainy days already.
My lettuce, that I planted in mid-March are about ready and are very happy.
We have been eating salad every night because the lettuce that was growing in my cold frames exploded into gigantic heads of spring lettuce. Lovely. 

It doesn't seem that our salad intake will slow up any time soon. But that's a good thing. It's great to be harvesting from my garden so early. I finally let my 2nd year asparagus flower. It was sad to stop picking, but I can see that in the next few years we will have plenty.
Here are the rows of carrots I planted in mid-March. 
Still small, but coming along and so much happier since they aren't being attacked by rabbits. 
Last week I planted a third row in between these two rows.
My sweet peas -- also planted mid-March -- are flowering!
It won't be long now. Towards the end of March I planted another row (behind this one in the picture), so we will get two 'batches' of peas. These will be great in our salads!
And our baby hens, how are they doing, you ask? Well, they are splendid. We had several families over last weekend so we out-placed our chicks to their very solid hen house out back. They're thrilled.

Here is one of our Rhode Island Reds.
Three Barred Rocks and a Rhode Island Red.
One New Hampshire Red (on the left) and Two Rhode Island Reds.
Don't they look comfy?
It's been a little chillier than usual here, so on those nights we've had two heat lamps going to keep them warm. In the beginning -- directly under the heat lamp -- the temperature should read 95 degrees. Then each week as they get more of their feathers the temperature can decrease by 5 degrees. Now we are down to 85 degrees. 

Tuesday, May 19, 2009

Awwwwwwwww . . .

Yesterday I started plugging away at my list of to do's. I decided I'd start with cleaning the house because it was cold and drizzling outside, and inside I have brought 'my house is a mess' to a whole new level. It had to be done. 

I started frantically with the downstairs, first cleaning the kitchen, putting in a load of wash, stripping the beds, folding some laundry, vacuuming the rugs then the floors . . . then I got the call. The "Your chicks are here and ready to be picked up" call. "Oh" I said, "a day early." Good grief, I'm thinking to myself, I haven't even gotten to setting up their little brood box (although I'd purchased everything I needed). That was tonight's project! "Alright then, I guess I'd better swing by and pick them up!"

I immediately dropped the vacuum where it was (it's still in the hall) and raced around setting up their new home in our basement by the window. Mayhem. I needed to pick up Ripley from preschool later that afternoon (Monday is his long day at school) so I had to finish setting up, race over to Agway, pick up the chicks, bring them home and get them settled before taking off to preschool. Needless to say, the house is not clean yet, but I've made some progress. 

Afraid to make a complete spectacle of myself I left my fancy camera at home (Oh boy, look at the silly novice Betty, bringin' the camera) and shot this picture with my cell phone. Here is a good portion of the chicks ordered by area folks who want to keep their own hens. These are all supposed to be hens. 

Words can't describe how adorable they are, peeping away, stumbling over everything. These are 'day old' chicks. Chicks can survive without food or water for 48 hours after breaking out of their egg. This is when they were popped in the mail, yes, the mail and sent to our Agway. Everyone gives the Postal Service a bad rap, but did you know that they will deliver day old chicks and packages of bees? Not bad.
There were still two large boxes that they hadn't 'unpacked' yet.
These girls had literally just been picked up from the post office. 
Here is the little box containing my 8 little chicks.
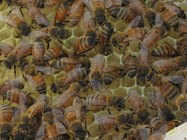
And here they are. Awwwwwww.
L-R: New Hampshire Red, Rhode Island Red, Barred Rock (or Plymouth Rock)
After their journey, they were a little pooped out.
A lot of books say to dip the beaks of the chicks in the water to show them where and what it is, then do the same for the food. After a few minutes of getting 'situated' they got busy exploring and went right to eating and drinking. No problem.
I've seen a lot of people use paper plates just to get them started, but they immediately started standing in it, then in short order -- pooing in it. So, the plate had to go. After they figured out the plate, I put the chick feeder right next to it and they got the hang of it right away. So, off with the plate. 

They were sorry to see it go though, because they sure had fun scratching and pecking in it. I think I will get a little sand for them to sprinkle on top of their litter and maybe their food. All of the books talk about giving your chicks / chickens grit, particularly if you are supplementing their diet with scraps, veggies and fruits, because chickens don't have teeth so they need little pebble-like things to crunch their food up. Plus, it seems to me, they just like pecking and scratching at it. But, my Agway doesn't carry it. I guess most people just use sand? If your birds are outside scavenging around, they find their own 'grit' laying around. But, it's still good to give them a supply, to be sure. 

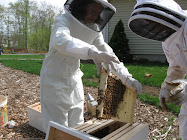
Dangling over their brood box is a heat lamp. Baby chicks need to be warm. In their box they need a range of temperatures from 73-95 degrees (this is why you see the thermometer in the box). You adjust the temperature by raising or lowering the heat lamp. If they all scatter to the outside edges of the box, they are too hot. If they are all huddled in the center under the lamp, they are too cold. If they are meandering all around in different places, eating and drinking . . . they are just right. This has been a bit stressful for me. I can't tell you how many times I've raised and lowered that silly lamp. I'm realizing that I am a worry wart of a mother. Now I understand my Grandmom (Mom's side) better. It comes from loving 'too much' and wanting to do a good job. I worry that when I go downstairs in the morning my chicks will be laying on their sides with rigamortis because I had the heat lamp too low, or too high! I worry that my bees will swarm because of lack of attention on my part. I worry that my children will fall on their heads from the swing set and break their necks. I know, I know, Matthew 6: 25-34!

When I was watching them yesterday it really seemed to me that they needed a gerbil wheel or something. They need some toys. They seemed a bit bored with what I had to offer them. I was dying to put a couple rips of lettuce in there, but I read online that they aren't ready for such things. Too bad. I think they would have had a lot of fun pecking at it. 

Names you ask? My boys have never been big on names. They come up with names such as this: For a penguin: Pengy. For a dog: Doggy. Last night when Victor came home he volunteered Tom, Dick and Harry. In unison we all said "They are giiiiiiiiiiiirllllllllssssssss". "Okay, Henrietta then" Victor corrected. Good grief. I can see I'm going to have help with some suggestions.

Thursday, April 30, 2009

How does my Garden Grow?

Here is a tour of what is happening around the yard. So many exciting things! The weather here in Massachusetts has been unseasonably warm, so all of the plants and trees have kicked into high gear. I've enjoyed three solid days of working outside in shorts and a t-shirt planting and weeding. I realized just now that I forgot to take pictures of my fruit trees that are flowering -- the cherry, peach and plum trees! Apple, apricot and early blueberries are ready to burst into bloom. 

Meanwhile . . . 
My garlic plants have grown! Don't they look fabulous? I'm dying to know what is happening under the soil, but don't dare to disturb one bulb. Besides, there isn't much to do at this point, right?
Here is one of my very happy 2nd year kale plants. I'm going to make a meal out of these leaves to see how they are, I'm guessing they aren't as tender? 
Ahhhhh . . . my asparagus bed. Do you see all of the shoots standing up tall? With the warmer weather we have had a full family serving every other day. That'salota asparagus!
Aren't the cute??
Amazing . . . and unusual plant. Don't you sometimes wonder how we started to eat certain things as human beings? I assume that people observed animals eating things and decided that they might be worth a try. Or, who was the poor soul who discovered that rhubarb and potato leaves are poisonous? That was not a satisfying meal!
Peas. I've heard two 'rules of thumb' on when to plant peas. 1) Plant when the crocuses bloom. 2) In our area, plant on Saint Patrick's Day. I love these home spun rules because they sound like something passed down from your grandfather around the breakfast table. "Ya know Lillian, I always said we gotta get those peas out when the crocuses bloom."
My remaining Leeks have become enormous! Time for some leek quiche! Ooooo . . . leek and asparagus quiche! As Victor would say "NOW were talkin'!"
Incidentally, I tried planting some 'lazy leeks' on the outside of our garden fence just for fun to see if they worked . . . and they did! Basically, you take the root bottom of a leek (even the ones you buy at the store) and plunk them in the ground. They should start to grow up. Interesting. The spot I've stuck them into is horrible for leeks, as they like well drained soil and this stuff here is like clay. Oh well. Just an experiment. But I might try a few more for fun! 
Look what I found! Blossoms on my strawberry plants! Now THAT'S exciting!
As you can see, our strawberry bed is much happier since installing our fence. So far, the rabbits are at bay. When the sprinkler guy came by to make some repairs (try as we did not to puncture the hoses . . . we did) he was flabbergasted by the seriousness of our fencing. Whatever it takes to keep those nibbling cottontails out of my strawberries and carrots! (We also protected against tunneling whippersnappers, just in case.)
And speaking of strawberries . . . my rhubarb has gone wild. In short order I should be able to cut some to make a pie. Can't wait. As you can see, I will have plenty for making jam, pies and whatever else you can do with rhubarb. 

Happy Rhubarb.
Here are my potato towers. You can read about them all over the web as a way to grow potatoes in a limited space. I have that gardeners disease where I always feel short on space and always want to expand. So, I thought I'd give these a try. Basically after making the wire cylinder, you fill the bottom with compost, old leaves, old grass clippings, ash is supposed to be good for PH, I threw in a little straw, a little dirt. THEN, you plunk a few seed potatoes on top of the six inches of compost cocktail, then put another 3 inches on top of the seed potatoes. When the potato plants push up through the compost, cover with more compost and continue doing this until you reach the top of the tower. Then harvest when the plants brown and die off. I'm a little concerned that potatoes will be exposed to light with this set up -- because this is what makes potatoes have a green skin and that's not good for eating. If I have to, I'll put some type of paper around the outside. We'll see. Of course my Portuguese husband thinks I'm nuts.(The Portuguese people know a thing or two about potatoes!) And he's teasing me about what his father will say when he sees my towers. Lets just hope I prove them wrong -- otherwise I'll never live it down! :)
My lilacs have sprung open. I adore lilacs. They are one of my favorite flowers. I have two, now enormous bushes. Three different colors, so they all spring open at slightly different times. This year, with the wacky weather they are all opening at once. Aren't they lovely?
An overview of my side and back yard where my garden is -- before everything is thick and lush. In the foreground is my perennial bed. Last year I started pushing into this with my herbs. So, the front part towards the road is packed with flowers, the back part -- herbs.
Our wild blackberry patch is starting to come alive!
And here is my new raspberry plot all planted. Not much to see just yet, but hopefully they will be! Only the everbearing variety I planted (1) will provide any fruit this summer. The summer raspberry fruits on one year old cane -- so I have to wait until next year. That's okay, I'm getting used to it!
And here are my bees in the afternoon. Yesterday, when I took this photograph, it was cooler than the previous 3 days so there was less activity. But they were still busy. In the afternoon they all start settling in and coming inside. 

Today I need to get suited up, start up my smoker and check to see if my queens have gotten out of their cages. Two friends who have new hives had burr comb because of how the frames are pushed all to one side to hold the queen cage between two frames. If given extra space, the bees will put 'non-approved' comb in that area. Usually this doesn't happen in just 3 days, but I'm planning on having it since two folks I know had it when they checked yesterday. Burr comb must be removed because it will prevent you from being able to remove the frames to check on your bees -- they will bind that whole area up. So, I'll have to smoke the area to get the bees off and 'quiet them' then pry off the burr comb with my hive tool. Make sure the queen isn't in it. Smoke / shake any remaining bees off it -- then get rid of it. And I was hoping for an easy intro . . . you know I'll tell you all about how it goes today!