Monday, June 28, 2010

Moving a Bee Hive

A few days before hand, I'd transfered my 'super nuc' into it's own new hive (I'm trying a traditional 10 frame this time), and put Tanya's nuc into her own hive (that I'd borrowed to create my super nuc). We had successfully raised (or rather the bees had) a laying queen that looks great (nice and big, like a date!), and now it was time to transfer the hive to it's new home just a 7 minute drive away. Tanya looked online and said that the info on moving a hive was rather limited, so I'll at least tell you what we did!

My brother, Scott is very handy-dandy so I trusted completely what he came up with. 
First: He used packing tape to tape up the cracks between each box. 


Second: He used strapping to hold the entire hive together.

Third: Since our drive was only 7 minutes, we stuffed the entrance hole with playdough. Generally, you are supposed to use some type of screening that I guess you'd nail or staple in place. But playdough seemed so simple and easy. Scott taped the playdough in place for good measure.

Fourth: Scott and Victor carried the hive to the car. I'm the type of beekeeper that gets fully dressed to do anything related to my hives. I have no pride about not wanting beestings. So, to see them do all of this without anything makes my skin crawl. When the TRANSFER event approached, I decided that this was a man-job. Sorry ladies. Having never done this, I was happy to have the men take over.

They plunked the hive into the back. As you can see, Tanya put up a quilt for good measure ... but I don't think a bee could get out of that Fort Knox if they wanted to!

Proud new beekeeper!

Carrying the bees to their new home.

Setting her down.

Now ... to unlock Fort Knox.

Success!!

Honey Lemonade and the Apiary

Honey Lemonade
My bee-friend Sarah introduced me to honey lemonade. Yum. So of course I've been experimenting. Here are a few versions I love:

Honey Mint Lemonade: 1 Cup honey mixed with 1 cup HOT water from the faucet, Juice of 3-4 lemons, 4 Cups cold water, 2 large sprigs mint, ICE. (Crush the mint and strain for a mintier flavor)

Honey Lavender Lemonade: 1 Cup honey mixed with 1 Cup water -- heat over the stove until hot, then throw in a large handful of lavender flowers into the pot. Remove from heat, cover and steep for 15 minutes. Juice of 3 lemons mixed with 4 Cups water. Pour steeped lavender/honey mixture through a strainer into the lemon/water mixture. Add ICE. Enjoy!!

Meanwhile, speaking of HONEY, there has been a lot of activity in what I might officially call my apiary. As I'd mentioned previously, my sister-in-law Tanya was interested in becoming a beekeeper herself. My hives seemed strong enough to split, so we did. I took 3 frames from one of my hives, and 2 from the other and created for Tanya a "nuc". Through this process, the bees will notice they are living without a queen and go about raising their own from fresh eggs on the frames in the nuc. (See previous entry for a lengthy description.) 

A week later, my bee mentor Diane came over to inspect my hives with me to see how they were doing. I wanted some more experienced eyes to take a look. "WOW!" she said "There are a LOT of bees in here! These are two very strong hives. You need to split again or you will get a swarm." Alrighty. I didn't have supplies for THAT!! Diane really thought I needed to take more than just 5 total frames out of both hives to have any impact. I needed to create either two nucs, or one SUPER nuc. So that's what we did. 

The next day Tanya was good enough to loan me her hive-in-waiting (while the nuc we'd just made the week before was incubating) to use for the super nuc, AND to help me dig into my poor hives AGAIN to create another nuc. 

It was a bee-bonanza. The bees weren't thrilled with being bothered yet again, but a beekeeper's gotta do what a beekeeper's gotta do. We took both of those hives all apart looking for all of the essential ingredients that go into a nuc -- then of course, ya gotta put everything back together with bees flying everywhere. Just stay focused on the task at hand and ignore the beezillion bees zipping around you and bouncing off your veil. 

We did it.
(This photo was taken just under a month ago after successfully creating our two nucs.)

Saturday, May 15, 2010

Splitting a Beehive

Today was a big day. My hives managed to make it through the winter and thrive this spring. My sister-in-law, Tanya has been interested in becoming a beekeeper herself after moving to 'the country' -- so I offered to give her a split from my two hives. And, today was THE DAY.

To 'split' a hive you are basically taking a total of five frames representing all stages of life of the brood, honey and pollen and creating a mini hive. Some people put these frames right into a regularly sized brood box, however other people (including one of the main teachers in my bee club) believes it's best to create a nuc, which is a mini hive of only five frames. It's easier for the young bees to manage -- to keep warm (as splits are typically done in the springtime) -- and defend. Here is a detailed explanation of what we did. Keep in mind, I am learning and have only been a bee keeper for one year. This was my first split. 

What you need:
One nuc -- the same height as the height of the brood box you will be splitting (aka: the parent hive).
A method of feeding your nuc, which may require a shim, or additional box on top of your nuc.
Sugar syrup ready to feed your nuc.
5 extra frames (and foundation) that fit the parent hive brood box.
An extra (empty) brood box. (I didn't have one of these so I used two honey supers stacked on top of each other, this seemed to work fine.)
A queen excluder
A bee brush
A place to put your nuc. If it is going to be the permanent location of the new hive, have the permanent stand set up to use for your nuc.
All of your regular bee equipment ... bee veil, smoker, tool, etc.

I ordered my nuc from Brushy Mountain Bee Farm. It comes in pieces.
This type of 'crafty' is a bit of a push for me . . . but I did it.
I did it! Here it is glued and hammered together.
A coat of primer and white paint.
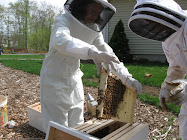
Okay, we are ready!! Tanya poses in front of the temporary home for her new bees!
I put WAY too many honey supers on my right hive in an effort to be sure the queen felt like she had plenty of room, and therefore wouldn't SWARM!
Here I am beginning the inspection of the left hive. Behind me is the year old raspberry patch.
The first thing we did was go through the two brood boxes in each hive to see if any queen cells (aka: SWARM cells) had been built. What I've heard, is that if queen cells have been created (or started) -- but not hatched -- the queen has already set her mind on swarming and its best to go ahead and put the queen from the parent hive into the nuc. This way, the queen thinks that she's swarmed, and the bees from the parent hive will go ahead and care for and birth the queen cells already in their hive. 

If all is well, and there are no queen cells in the hive this is what you need to do:
Choose from the parent hive (I took frames from both hives to lessen the impact on the hives):

1 Frame of honey/nectar
Be sure there is a significant amount of pollen in some of the other frames:
2 Frames of open brood
1 Frame of capped brood
1 Frame with fresh eggs

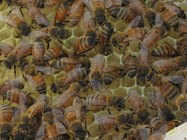
Once you've identified a frame for your nuc, make sure the queen isn't on it then, shake the bees off the frame in one big motion (or two) then brush off the remaining bees and put the frame into the extra (empty) brood box. Replace the frame from the parent hive with one of the extra (empty) frames -- these are best put on to the ends of your brood box. 

Repeat the above process until you have all five frames chosen, de-beed and put into the extra brood box. Then, put the queen excluder on top of the parent hive, put the extra brood box with the 5 selected frames in it, on top of the queen excluder. Put the inner and outer covers on and leave it for an hour or so.

What's happening? 
First, young nurse bees care for brood. By shaking off all of the other bees, isolating the frames, then putting the queen excluder under the nuc-to-be frames -- over the next hour, the nurse bees will naturally come up to care for the brood there, and importantly the queen from the parent hive doesn't travel up into the nuc to-be. These nurse bees, sensing that they have no queen, will create special queen cells around some of the fresh eggs and begin feeding them royal jelly to make a queen for their hive. QUITE amazing. 

After the hour has passed, remove each frame (which should now have nurse bees crawling all over them) and slide them into your nuc one by one. Put the frame with the fresh eggs in the middle, the frames with honey / nectar / pollen on the outside edges. Don't forget to put your feed on the nuc. Any foragers that made it into the nuc will naturally go back to their original hive. Nurse bees haven't ever left the hive before, so they will stay where they've been put. That said, there won't be any bees in the hive old enough to forage and feed the hive for a few weeks. Button up the nuc, and in 21 days you can open it up and hopefully see that you have a new queen! At this time you can put all of these frames / bees into a new permanent hive.

As I was inspecting the left hive (and searching for two frames to add to the nuc) the right hive already has the queen excluder and extra brood box with three 'chosen' frames (shaken & brushed) on top of the parent hive ... that's why it looks SO tall. I had put on an extra (two total) honey super to discourage swarming. Perhaps it DID help (as silly as it looks) because what I found when I went into the left hive is that it had already swarmed! It has been particularly nasty so I haven't been able to inspect it well -- and that explains it. A hive without their queen can be persnickety! They still weren't thrilled by my presence so I kept it brief -- pulled two frames and buttoned her up. Hopefully as the new queen (which I didn't see) gets established things will settle down. Otherwise, I may have to consider re-queening. Sometimes you just have a crabby one. Because they had already swarmed I only did the queen excluder routine on the right hive. 
What actually happened with my hives? Well, the one hive I'd put 

Sour Cream Poppyseed Cake Recipe -- The BEST!

Since drinking my first Lattes at the Trident Cafe and Bookstore in Boulder, CO in the early 90's I've been in search of a certain type of poppyseed cake recipe. Many mornings before work at the first Wild Oats market stores, I'd zip over to "The Trident" and order a latte and a poppyseed muffin. It was a recipe that was different than most lemon or orange flavored versions -- rather it was made with sour cream and was citrus-free! I loved it. Over the years when roaming into cafes or bakeries I'd spy something similar, but alas, they would ALWAYS have some type of citrus either in the batter, or coated on top. Yeck.

Finally, I decided to search around online and found an obscure recipe that looked just about right. I tried it last night to serve at small group and it was FABULOUS! Yea! My first effort was slightly underdone so I didn't snap a picture, but next time -- I promise -- I'll document my creation.

Meanwhile, here is the recipe:

Sour Cream Poppyseed Cake
preheat oven to 350 (I may try 325, and bake it a little longer next time)

Sift:
2 C flour
1 t baking powder
1/4 t salt

Beat:
2 egg whites until stiff, set aside
(use the yokes in butter / sugar mixture below)

Cream:
1 C butter
2 C sugar
2 egg yokes
1/2 t vanilla extract
1/4 t almond extract

Add alternatively to above mixture:
1 C sour cream or yogurt
5 T poppyseeds
Flour mixture

Then fold in gently the beaten egg whites.

Spoon into greased loaf pan.

Bake 350 for 60+ minutes
Cool in pans for 10-15 minutes

Thursday, April 22, 2010

Grilled Romaine, Asparagus & Onions, and BEES


My girlfriend Vivian has gotten me into this strange dish: Grilled Romaine. 
Sounds odd, I know. But really it's delish!
What to do: Start up the grill. Drizzle olive oil on both sides of a rinsed head of romaine (do your best). Don't chop so much off the end that the head comes apart. Then add salt and pepper. Throw it on the grill.
I'd say I grill it about 5 minutes each side on medium heat. Use tongs to flip over. 
Drizzle a little extra olive oil on top and EAT! Sounds strange, but it's yummy. Throw a few crumbles of feta or blue cheese on top if you like. Lots of freshly ground pepper.
Here are fried onions with braised asparagus fresh from my garden. Just fried up in a little olive oil, salt and pepper. 
My bees were going bonkers yesterday. Orientation flights in the afternoon. It was crazy over there!!
See the butt of the honey bee sticking out of this apple blossom?

Monday, April 12, 2010

Welcome Spring!

Spring has sprung! There is evidence and excitement all over our yard . . .

Rhubarb (now in it's 3rd spring) is showing itself . . . 

Swiss Chard, overwintered in cold frames are looking fabulous . . . 

Strawberries are coming to life and have been thinned and strawed . . . 

Hens (now almost one) are in the full swing of laying motion. Here is Pearl, our best layer.

The hens have been in trouble recently though for raking the nice straw in their nesting boxes, out with they big ole feet!! Silly hens.

This is probably Elizabeth, our medium sized Barred Rock. 
The Rocks were very keen on investigating this camera business . . . 

Garlic (4 varieties) planted in the fall is looking healthy! Can't wait!

Asparagus (3rd spring) is ready to start picking daily. A wonderful thing.

My honey bees are a-flyin' -- pictured here on a peach tree.
Both hives have made it through the winter.
One has symptoms of Nosema, so I've treated both hives with medicine. Both queens are laying, and there is fresh brood in both hives. We actually saw baby bees being born when we went in for the first time last week! 

One of my dwarf peach trees in bloom.

A plum-cot tree in bloom. (plum & apricot combined)

Banana Bread


cream below:
1 stick butter, room temp
1 C sugar
add in:
2 eggs

sift together then add to above mixture:
1 1/2 C flour
1 t baking soda
1 t salt

combine then add to above mixture:
1 C mashed ripe bananas
1/2 C sour cream or plain yogurt
1 t vanilla extract

stir in 1/2 C walnuts & 1/2 C chocolate chips (if desired)

Bake in one greased loaf pan at 350 degrees for 1 hour.
Cool in pan for 10 minutes, then turn out onto cooling rack.

Delish!

Wednesday, March 3, 2010

Zucchini Bread Recipe

By request: A delicious, easy zucchini bread recipe given to me by my sister-in-law (from a friend of hers) that even my vegetable fearing son Ripley loves. What a review!!

2 greased loaf pans
Preheat oven to 325 degrees

Beat:
3 eggs
2 C sugar
2 t vanilla
1 C oil (I use canola)
2 C grated zucchini

Sift:
3 C flour
1 t salt
1 t baking soda
1/2 t baking powder
3 t cinnamon
1/2 C chopped walnuts or pecans (if desired)

Mix the top list with the bottom list gently until blended with a wooden spoon for a tender crumb.
Bake at 325 degrees for 55 minutes - 1 hour, until a toothpick comes out clean and/or the bread begins to pull away from the sides of the pan. Set on a cooling rack in the pans for 10 minutes, then turn the bread onto the cooling racks. Yum!! Eat with butter or strawberry jam! Delish!

Honey Bees Flying in March

Yesterday I ventured under the cover of my hives for the first time. My smaller hive has only the two brood boxes on it, so I was particularly concerned that they may had run out of honey. When I went in, they gave me the 'butts up' sign to communicate their crabbiness -- so it's possible. Since they were a bit crotchety in the first place, I didn't do anything more than put a pile of granulated sugar on wax paper on top of the frames. Some people are opposed to such a thing, some people are 'okay with it'. But after a sugar candy (fondant) making failure, it was my only option. I was finally able to make a successful batch (take 4) last night and as soon as the weather behaves, I'll put some in both hives. My larger right hive has a honey super on top, so I expect they are fine, however I gave them a small pile of sugar as well, just in case. The bees in that hive were down lower in the hive and seemed more cheerful. However, it's as if they were all bored. They were all landing on me! Ooooo .... maybe THIS is a flower?! Or, in the absence of flowers, we may as well go over and check this big white thing out ... Both hives had bees flying, but the right hive in particular looked like a summer afternoon of orientation flights! It made me so happy! I nearly teared up. "We made it through the winter!!" By the time I got my video camera outside things had settled down, but I thought I'd share what I saw. So encouraging!

Ripley skiing February 2010

While not particularly eco-friendly, we did enjoy a week of skiing up in New Hampshire during school vacation. Now we can all ski together as a family!! No more bunny slopes or magic carpet for us!! Woo-Hoo! Take a look at Ripley's navigation skills . . . .

Friday, January 29, 2010

Bee Debacle

It has been unseasonably warm here for a few days. On Monday when I pulled in the driveway after dropping the boys off at school, what did I see? My bees were flying! It was in the low to mid fifties and my hibernating bees had decided to take a few investigative flights. I was such a proud mother! I leapt out of the car leaving the door wide open, ran inside and grabbed my camera. My bees were flying!!!

Can you see the one bee coming in for a landing in this picture? This shot doesn't show it, but there were about five to ten bees out and about around the hive. Exciting.


Now, fast forward six hours. That day, driving rain and strange gusty winds were going to be coming through. I'm not sure at what point this happened, and I don't know for how long they were exposed. But, because of the wind and rain, on my way home from an errand I stopped by the bus stop to pick up Benjamin (10). When I pulled in the driveway, I saw a horrifying mess!! The outer covers on both of my hives had blown off completely exposing the inner cover which has a 5x1 inch hole cut out of the top!! The worst part was, on my left hive, even the inner cover had blown off, leaving the frames where the bees live exposed!! Horrible! I raced over there with my bare hands and face and threw everything back together. There were a couple bees around the entrances (thinking to themselves HELP! We've been abandoned and forsaken by our keeper!!!) but they had enough problems to be worrying about me. Plus, it was blowing a gale! 

I put everything back together, and slid the bottom boards out so that any moisture could drip out and evaporate more quickly. What a mess. This certainly weakens the hive and who knows how many of my bees have died as a result. Poor things. After two days, I slid the bottom boards out, since the night time weather was going to be below freezing. I did see some flying two days ago when the temps were in the upper 40's. I hope they are okay. I am disappointed. 

Now I have TWO LARGE rocks on the tops of both hives . . . 

Tuesday, January 26, 2010

URGENT: Help for Haiti, Calling all Pilots!


My brother Scott has had a love for flying ever since he could form words. My father was a recreational pilot and earned money to buy his first tail-dragger (plane) white washing fences in Montgomery County Maryland when he was sixteen. So, as early as third grade Scott would sit in the right seat on a booster in planes my father would fly, watching and learning. When he was finally old enough to take flying lessons, Massachusetts had recently changed the driving age (for cars) to 16 1/2, however the age to solo an airplane was still 16. So, Scott would ride his bike to the airport and log time on a rented plane. Next to the Lord, his wife, his family and friends, flying is the love of his life. Not only does he love it, but he is exceptionally good at it.


When it came time to choose a career, my father lobbied hard to have him join the 'family business' (which involves handbags, not planes) and over the years, between the two of them they have managed to have a plane Scott could fly, and meanwhile Scott's skills as manager and leader have blossomed at the family business.

Our church Community Covenant Church has been working with Haiti for the past four years bringing the Leadership Summit to them in the late fall, in hopes of bringing folks from the business, medical, government, and church world together to develop leadership skills, training and encouragement to the people of Haiti -- in hopes of giving them tools so that they can help themselves. Through our contacts and the love we have developed for Haiti, when the earthquake hit our church had to do SOMETHING. So my brother Scott along with our Pastor, loaded up his twin engine MU2 plane with 600 lbs of medical supplies donated by nearby doctors and Partners in Health out of Boston and headed for Port au Prince via Ft. Lauderdale and the Dominican Republic.

As the Lord often does with willing hearts, once Scott and Pastor Dennis were down there, He opened all kinds of doors for them to help. Their story has been life changing for both themselves, the people praying for them, and certainly the people they have been able to supply with everything from antibiotics, IV fluid, food, water and baby food.

However, the relief effort at this time is NOT getting aid to people outside of Port au Prince, except for the help of folks like my brother Scott. He has posted an URGENT call for pilots and their planes to come down to Haiti and help. Here is the post: URGENT: Call for Pilots to Haiti Even if you're not a pilot and don't know one, watch and see some of what he's been running into. And, pass the word. You never know who you will run into that knows someone, who knows someone, who will be able to go and help.

Thursday, January 21, 2010

Accomplishment


This weekend, Victor and I went to Bermuda for the long weekend to participate in the Bermuda Race Weekend. The "destination road race" was an effort to get Victor back "on the road". He has run over 25 marathons and since being married has had a difficult time with work, wife and whipper-snappers (our beautiful, wonderful boys) making time to exercise. To sign up for such a big trip sort-of puts the pressure on to get in shape and somehow make it happen. And he did!

We were blessed with gorgeous weather while we were there. Typically things can get a little raw this time of year with cold wet windy weather around 60 degrees. However, as you can see we had clear mid and high 60 degree days. (The day after the 1/2 and full marathon the weather included gale force winds and driving rain .... crisis avoided!)

The day before our race, in an effort to conserve our legs, we rented mopeds and cruised all over the western part of the island. In Bermuda (which is far off the coast of North Carolina) they drive on the left side of the road, so that was a bit tricky getting used to ... but what a gorgeous, quaint island. The islanders are wonderful, thoughtful and kind. Numerous times we had islanders go out of their way to ask we needed directions, even if we were just pulled over looking at the sites. One family actually drove us through a short cut back to our hotel.

During the Bermuda Race Weekend there are four different races. I was amazed at the percentage of people who participated in the "Bermuda Triangle Challenge". This was a combination of three of the races. A mile race Friday evening, a 10K race Saturday morning, and either the 1/2 or full marathon on Sunday morning. Can you say WOW? Victor and I opted for the 1/2 marathon and playing around the island the rest of our stay. But the whole event was a runners dream. One race after the next with runners scattered all over the island and running conversation seeping out of every restaurant, bar and coffee shop. A lot of running groups went, participating in all three events, and they seemed to be living it up in spite of all of the running! Can you say Rum Swizzle (fruit juices and rum)? Or Dark and Stormy (dark rum and ginger beer)?

Back to the race, the 1/2 marathon course (which is the same loop for the marathon, you just run it twice which has got to be a little demoralizing as you run past all of the 1/2 marathoners finishing, cheering, hugging and high-fiveing), is very hilly. Victor, whose marathons have generally been at "BOSTON", said that the course was more difficult than Boston. The first half of the course has several big hills with nice (you have to be positive) downhills afterwards. However, the back half has numerous, seemingly unrelenting smaller hills, with a short flat, then up again, and then a flat ... but not a whole lot of down for "a rest". It's tough, but thankfully we live in a very hilly area so I had done quite of bit of hill work simply because this is where I run. So, if you go, you just have to be prepared -- that's all. I really felt great the entire way and kept my pace at between 9:00 and 9:15 minute miles (monitored thanks to Victor's new Christmas Gift: a GPS watch) and ended up beating my previous 1/2 marathon time by almost five minutes. I was very proud of my accomplishment particularly because after seeing all of the volcanic hills around Bermuda, planned on just running the race, enjoying the scenery and doing my best. But, I did it! Whoo-Hoo!

During our run, it was bright and sunny and only clouded up afterwards. We stuck around a little bit to see the Elite Marathon Runners come through (shortly after we finished our HALF marathon!) and cheer folks on. We couldn't take our "after" picture until we got back to the hotel and retrieved my camera. Fun stuff. Thanks Bermuda! We had a wonderful time.

Monday, January 11, 2010

Back at the Skating Pond


L-R: Ripley, Reese and Rosalie

On Sunday, although I had a million and one things to be done at home, I took Ripley and went to my brother's skating pond for some fun while the cold weather is still holding. But THIS TIME I brought along hot chocolate (the homemade kind with milk, chocolate and vanilla) and chocolate chip cookies. [Note: the Chocolate Chip Cookies were made from my own "Tollhouse Tubes" that you might purchase in the grocery store. I made a double batch of cookie dough, lined up a 'logs' of dough on plastic wrap and threw it in the freezer. This way you can have fresh cookies on the fly!]

Here's the skating pond. Isn't it great? This weekend, my brother Scott and a couple of his buddies shoveled snow off the remaining half of the pond. I don't know about the other guys, but Scott was just a wee bit sore. After skating for awhile, the kids put on their boots and went sledding down the hill onto the ice! What fun, fast sledding!

This is (if I do say so myself) an adorable shot of my niece Rosalie and her "Papa", Tanya's father, sledding.

Time for Hot Chocolate and Cookies!

Which'l give you enough energy for some 'Boot Hockey'!
Pictured: Ripley, Tanya's Dad: David aka: Papa, Reese and Scott

Sunday, January 10, 2010

Tanya's Balsamic Garlic Dressing

I am blessed that my brother chose a wonderful, talented, smart, compassionate, kind, dear, thoughtful, fun woman as his wife. It doesn't always work out that way, and I am so thankful. My Sister-in-Law Tanya and I are close friends and love good food. We are always swapping recipes, and if we have a common cookbook, we will call one another and say "Sheesh, if you haven't tried the recipe for such-and-so, you should! It's fabulous!" So, featuring her dressing is, well, very appropriate.


My SIL Tanya, pictured center with my nephew Spencer
at Christmas Eve Dinner where we all enjoyed her dressing.

Victor and I generally use olive oil, lemon, salt and pepper on our salads. It's good for you, doesn't have a lot of those awful ingredients so often found in dressings, and is a lot cheaper ... AND we love it!

But after hangin' with my sister-in-law Tanya over the holidays, I came to love her stand-by dressing as well. It's delish, and she usually makes a decent sized jar of it and uses it for several days. Brilliant!

Here is the recipe in her own words:

Smashed , but not chopped garlic (2-3 cloves). 
4 parts good olive oil, 
to 1 part balsalmic reduction, balslmic glaze, or just a really nice balslmic vinegar.  
One heaping teaspoon of dijon mustard.  
Salt and pepper.  
Voila!  
So simple!


Thanks Tanzerlee!
Love you, Sandstone

Friday, January 8, 2010

The Birds and The Bees

Awww .... aren't they cute? One of each of my three breeds of hens: Barred Rock, New Hampshire Red, Rhode Island Red. It's snowy around here, and my hens weren't venturing out of their hen house much, so I threw some straw out around their house and they love it. Since then, they get out most of the day and tromp around. Here, my three hens are sunning themselves in the 30 degree weather under the hen house.
In spite of the cold weather and shorter days, my girls are young and laying up a storm. The day before we didn't have any eggs, then yesterday we had seven! So, to catch up, I made a double batch of zucchini bread and quiche for dinner.
Here is a picture of the hen house with the small bit of snow that is still hanging on. (Here, being relatively close to the ocean and the gulf stream, our snow doesn't tend to stick around very long, sadly. For me, if it's going to be cold, I'd just assume have snow for sledding and ice for skating!)
My honey bees are all wrapped up for the winter. In November I finally got to putting up the mouse guard (narrow fencing stapled to the entryway). The thought of stapling a bee hive just didn't sit well with me. Even though it was below freezing (an old timer told me they can't fly below freezing, but I don't know if that's true?) on the day I stapled the fencing to the entrances, I still put on my veil. I couldn't help myself.

The mouse guard, well, prevents mice. Apparently it's very common for mice to find their way into the hive to keep warm. Ugh. Mainly they make a big mess, and sometimes the bees win out and propolis (bee glue) the poor mouse from head to toe, so it looks sort-of mummified.

Finally in December before the big cold snap, I wrapped my hives in roof felting to help them to keep warm. It's not necessary to do this, but a lot of people feel it helps them through the cold winter months. Perhaps then they use up less energy trying to stay warm, which by the way they do in a similar way to the Emperor Penguin where the Queen Bee is in the middle, then they cluster around her in a big ball. The bees take turns being on the warm inside, versus the chilly outside of the cluster. Cool eh?
Some bees do slowly die through the winter. So when they do, as is customary, worker bees push the dead bees out of the hive on a warm (relatively speaking) day. So far I've seen two batches of 10 from each hive over two months. The idea is that before winter you want to have a large strong hive that has plenty of honey stores to make it through to warmer months. I hope mine make it. It will be sad if they don't after all my work, but I have certainly learned a lot and will start over and purchase more bees if they don't.

Tuesday, January 5, 2010

The Upside of Cold

The new place that my brother Scott and his wife Tanya just purchased in town has a small manmade swimming hole in the back woods. Yesterday after school, we took advantage of the cold weather and went for a skate! My brother Scott in his customary form purchased a real-deal ice tester. When they emailed a picture of their family on the ice two nights ago, we rushed over the very next day! What fun. It's a crime, truly, that so many of these joys have been robbed of children in fear of crazy law suits. Several ponds around town carry a sign out front "No Skating". In "wining", we've lost. And it's a shame.

Next time I will be sure to save time to brew some hot cocoa! When Scott and I were kids living in both Illinois and Maine where cold weather is a 'sure thing', Mom would bring along a big thermos of hot cocoa to warm us up. What a treat. Fond memories. Next time! We still have a weeks worth of cold weather in the forecast.

Benjamin and Ripley marching into the woods
Brothers skating
My nephews Spencer and Reese, brothers sliding.
What adorable boys, would you just look at Spencer's blue eyes?!