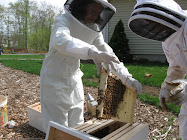
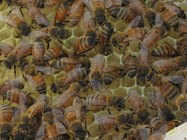
Today was a big day. My hives managed to make it through the winter and thrive this spring. My sister-in-law, Tanya has been interested in becoming a beekeeper herself after moving to 'the country' -- so I offered to give her a split from my two hives. And, today was THE DAY.
To 'split' a hive you are basically taking a total of five frames representing all stages of life of the brood, honey and pollen and creating a mini hive. Some people put these frames right into a regularly sized brood box, however other people (including one of the main teachers in my bee club) believes it's best to create a nuc, which is a mini hive of only five frames. It's easier for the young bees to manage -- to keep warm (as splits are typically done in the springtime) -- and defend. Here is a detailed explanation of what we did. Keep in mind, I am learning and have only been a bee keeper for one year. This was my first split.
What you need:
One nuc -- the same height as the height of the brood box you will be splitting (aka: the parent hive).
A method of feeding your nuc, which may require a shim, or additional box on top of your nuc.
Sugar syrup ready to feed your nuc.
5 extra frames (and foundation) that fit the parent hive brood box.
An extra (empty) brood box. (I didn't have one of these so I used two honey supers stacked on top of each other, this seemed to work fine.)
A queen excluder
A bee brush
A place to put your nuc. If it is going to be the permanent location of the new hive, have the permanent stand set up to use for your nuc.
All of your regular bee equipment ... bee veil, smoker, tool, etc.
I ordered my nuc from Brushy Mountain Bee Farm. It comes in pieces.
This type of 'crafty' is a bit of a push for me . . . but I did it.
I did it! Here it is glued and hammered together.
A coat of primer and white paint.
Okay, we are ready!! Tanya poses in front of the temporary home for her new bees!
I put WAY too many honey supers on my right hive in an effort to be sure the queen felt like she had plenty of room, and therefore wouldn't SWARM!
Here I am beginning the inspection of the left hive. Behind me is the year old raspberry patch.
The first thing we did was go through the two brood boxes in each hive to see if any queen cells (aka: SWARM cells) had been built. What I've heard, is that if queen cells have been created (or started) -- but not hatched -- the queen has already set her mind on swarming and its best to go ahead and put the queen from the parent hive into the nuc. This way, the queen thinks that she's swarmed, and the bees from the parent hive will go ahead and care for and birth the queen cells already in their hive.
If all is well, and there are no queen cells in the hive this is what you need to do:
Choose from the parent hive (I took frames from both hives to lessen the impact on the hives):
1 Frame of honey/nectar
Be sure there is a significant amount of pollen in some of the other frames:
2 Frames of open brood
1 Frame of capped brood
1 Frame with fresh eggs
Once you've identified a frame for your nuc, make sure the queen isn't on it then, shake the bees off the frame in one big motion (or two) then brush off the remaining bees and put the frame into the extra (empty) brood box. Replace the frame from the parent hive with one of the extra (empty) frames -- these are best put on to the ends of your brood box.
Repeat the above process until you have all five frames chosen, de-beed and put into the extra brood box. Then, put the queen excluder on top of the parent hive, put the extra brood box with the 5 selected frames in it, on top of the queen excluder. Put the inner and outer covers on and leave it for an hour or so.
What's happening?
First, young nurse bees care for brood. By shaking off all of the other bees, isolating the frames, then putting the queen excluder under the nuc-to-be frames -- over the next hour, the nurse bees will naturally come up to care for the brood there, and importantly the queen from the parent hive doesn't travel up into the nuc to-be. These nurse bees, sensing that they have no queen, will create special queen cells around some of the fresh eggs and begin feeding them royal jelly to make a queen for their hive. QUITE amazing.
After the hour has passed, remove each frame (which should now have nurse bees crawling all over them) and slide them into your nuc one by one. Put the frame with the fresh eggs in the middle, the frames with honey / nectar / pollen on the outside edges. Don't forget to put your feed on the nuc. Any foragers that made it into the nuc will naturally go back to their original hive. Nurse bees haven't ever left the hive before, so they will stay where they've been put. That said, there won't be any bees in the hive old enough to forage and feed the hive for a few weeks. Button up the nuc, and in 21 days you can open it up and hopefully see that you have a new queen! At this time you can put all of these frames / bees into a new permanent hive.
As I was inspecting the left hive (and searching for two frames to add to the nuc) the right hive already has the queen excluder and extra brood box with three 'chosen' frames (shaken & brushed) on top of the parent hive ... that's why it looks SO tall. I had put on an extra (two total) honey super to discourage swarming. Perhaps it DID help (as silly as it looks) because what I found when I went into the left hive is that it had already swarmed! It has been particularly nasty so I haven't been able to inspect it well -- and that explains it. A hive without their queen can be persnickety! They still weren't thrilled by my presence so I kept it brief -- pulled two frames and buttoned her up. Hopefully as the new queen (which I didn't see) gets established things will settle down. Otherwise, I may have to consider re-queening. Sometimes you just have a crabby one. Because they had already swarmed I only did the queen excluder routine on the right hive.
What actually happened with my hives? Well, the one hive I'd put


