Since drinking my first Lattes at the Trident Cafe and Bookstore in Boulder, CO in the early 90's I've been in search of a certain type of poppyseed cake recipe. Many mornings before work at the first Wild Oats market stores, I'd zip over to "The Trident" and order a latte and a poppyseed muffin. It was a recipe that was different than most lemon or orange flavored versions -- rather it was made with sour cream and was citrus-free! I loved it. Over the years when roaming into cafes or bakeries I'd spy something similar, but alas, they would ALWAYS have some type of citrus either in the batter, or coated on top. Yeck.
Finally, I decided to search around online and found an obscure recipe that looked just about right. I tried it last night to serve at small group and it was FABULOUS! Yea! My first effort was slightly underdone so I didn't snap a picture, but next time -- I promise -- I'll document my creation.
Meanwhile, here is the recipe:
Sour Cream Poppyseed Cake
preheat oven to 350 (I may try 325, and bake it a little longer next time)
Sift:
2 C flour
1 t baking powder
1/4 t salt
Beat:
2 egg whites until stiff, set aside
(use the yokes in butter / sugar mixture below)
Cream:
1 C butter
2 C sugar
2 egg yokes
1/2 t vanilla extract
1/4 t almond extract
Add alternatively to above mixture:
1 C sour cream or yogurt
5 T poppyseeds
Flour mixture
Then fold in gently the beaten egg whites.
Spoon into greased loaf pan.
Bake 350 for 60+ minutes
Cool in pans for 10-15 minutes
Showing posts with label Recipes. Show all posts
Showing posts with label Recipes. Show all posts
Saturday, May 15, 2010
Thursday, April 22, 2010
Grilled Romaine, Asparagus & Onions, and BEES
My girlfriend Vivian has gotten me into this strange dish: Grilled Romaine.
Sounds odd, I know. But really it's delish!
What to do: Start up the grill. Drizzle olive oil on both sides of a rinsed head of romaine (do your best). Don't chop so much off the end that the head comes apart. Then add salt and pepper. Throw it on the grill.

I'd say I grill it about 5 minutes each side on medium heat. Use tongs to flip over.
Drizzle a little extra olive oil on top and EAT! Sounds strange, but it's yummy. Throw a few crumbles of feta or blue cheese on top if you like. Lots of freshly ground pepper.

Here are fried onions with braised asparagus fresh from my garden. Just fried up in a little olive oil, salt and pepper.

My bees were going bonkers yesterday. Orientation flights in the afternoon. It was crazy over there!!

See the butt of the honey bee sticking out of this apple blossom?

Monday, April 12, 2010
Banana Bread
cream below:
1 stick butter, room temp1 C sugar
add in:
2 eggs
sift together then add to above mixture:
1 1/2 C flour
1 t baking soda
1 t salt
combine then add to above mixture:
1 C mashed ripe bananas
1/2 C sour cream or plain yogurt
1 t vanilla extract
stir in 1/2 C walnuts & 1/2 C chocolate chips (if desired)
Bake in one greased loaf pan at 350 degrees for 1 hour.
Cool in pan for 10 minutes, then turn out onto cooling rack.
Delish!
Delish!
Wednesday, March 3, 2010
Zucchini Bread Recipe
By request: A delicious, easy zucchini bread recipe given to me by my sister-in-law (from a friend of hers) that even my vegetable fearing son Ripley loves. What a review!!
2 greased loaf pans
Preheat oven to 325 degrees
Beat:
3 eggs
2 C sugar
2 t vanilla
1 C oil (I use canola)
2 C grated zucchini
Sift:
3 C flour
1 t salt
1 t baking soda
1/2 t baking powder
3 t cinnamon
1/2 C chopped walnuts or pecans (if desired)
Mix the top list with the bottom list gently until blended with a wooden spoon for a tender crumb.
Bake at 325 degrees for 55 minutes - 1 hour, until a toothpick comes out clean and/or the bread begins to pull away from the sides of the pan. Set on a cooling rack in the pans for 10 minutes, then turn the bread onto the cooling racks. Yum!! Eat with butter or strawberry jam! Delish!
Friday, January 1, 2010
Eggs with Kale and Garlic
My favorite way to eat the fresh eggs from our eight hens is a Kale Scramble. Love it! Love it! Love it!
Make your basic recipe for scrambled eggs: Eggs, Salt, Pepper and a splash of Milk. Set aside.

Meanwhile, drizzle olive oil in a skillet and heat over medium low. Add in chopped garlic and heat until soft. Then add in salt, pepper, red pepper flakes and chopped kale (fresh from the garden, even in winter months).

Toss until the kale is bright green and tender.

Pour in your scrambled egg mixture and gently fold in the eggs as they firm up on the bottom of the pan. Don't over stir. YUMOLA!

Wednesday, October 7, 2009
Pepper Jelly Recipe
Pepper Jelly is particularly yummy over cream cheese served with crackers, as an appetizer.
You can also mix the cream cheese together with the pepper jelly for a dip.

(I doubled the recipe listed below and used 1/4 pint jars ... so, for example I used 2 sweet bell peppers, etc.,)
1 cup ground sweet bell pepper, approximately 1 large pepper, including juice
2 to 4 T (depending on how hot you want your jelly, I used 4) finely chopped jalapeno peppers (I used cayenne, jalapeno and sereno)
3/4 C cider vinegar
1/2 C water
1/8 t salt
2 T lemon juice
1 box standard powdered pectin (1 3/4 oz)
2 1/2 C sugar
Seed the sweet and hot peppers (chop, then measure) and then throw in a food processor until "ground", put peppers and the juice into a large pan. Add in and stir together: vinegar, water, salt, lemon juice and pectin. Set the heat on medium-high and bring to boiling. THEN add in the 2 1/2 C sugar. Bring again to a full rolling boil that cannot be stirred down; boil hard for 1 minute. Remove from heat, skim froth, stir. Ladle into sterilized (boil 20 minutes) hot (from being sterilized) 1/2 pint jars, leaving 1/4 inch of headroom. Thoroughly wipe sealing rim of jars with fresh paper towel, put on prepared disk lid, and screw the bad down firmly. Process in a covered pasteurizing water bath at 185 degrees for 10 minutes. Remove jars and set on a dry folded towel where they can cool upright and naturally.
Yum. Yum.
Cooking Edamame
Aren't they cute? These are edamame picked fresh from my garden. I made them on Sunday to compliment the Patriots game. They were so yummy. I planted these at some point in August, and they are finally ready for picking -- just in time before the frost comes. Chipmunks apparently love Edamame seedlings, and ate several baby plants. But I ended up with enough to keep me cheerful.

I searched online to see how to cook them. It seemed as though they'd be pretty straight forward, but I just wanted to be sure. My favorite explanation was created by a young Japanese woman on YouTube. She was quiet and simple during the presentation, but the best part was that she had obviously learned to cook from her mother or grandmother using observation instead of time to determine 'doneness', and other tips. She said the way to know if your edamame are done, is by looking to see when the pods crack open slightly. Then, she insisted that to cool them off, don't use cold water as this (apparently) hurts flavor. Rather, she fumbles through a cabinet, and whips out a hand held fan to cool them (like everyone must have fans hiding in their kitchens, at the ready). I thought that was priceless. Of course I've been cooling beans with water, even ice water, for years, but I dutifully used a folded piece of paper to cool my homegrown edamame.
Basically, you put about 1 T salt into a pan of water (filled enough to be sure the beans are covered with water) and bring to a boil. When the water is boiling throw the beans into the water for 4-5 minutes (when the pods start to crack open slightly). Drain. Fan to cool, gently stirring to give them all a chance in front of the fan. Toss with one teaspoon or so of kosher or coarsely ground sea salt. They were so yummy, and I was so proud!
Here is the YouTube link: Kirin's Edamame
Take a look at her modern spice drawers -- I want one!
Wednesday, September 16, 2009
Free-Form Raspberry-Rhubarb Tart

As you may recall, this spring we planted 12 raspberry plants this year. Some are early bearing, others later -- which is nice because you get a steady flow of gorgeous raspberries. On the first year you can't expect to get much of anything, but perhaps because of all of the rain we received, we have a nice little smattering of raspberries. Even though I figured my rhubarb was tough at this point, a found a few relatively new shoots and cut them off. Together with the raspberries I made a free-form raspberry-rhubarb tart. Boy was it good.
For the filling, a free-form tart is great because it doesn't have to be a certain size and you can just try different things. It takes a lot less time than a pie, and is smaller.
I added:
Approximately 1 1/2 pints of raspberries
4 small stalks of rhubarb, thinly chopped
1/4 cup sugar
1 T flour
shake of cinnamon
shake of nutmeg
few slices of butter for the top
sprinkle sugar on top, including crust part.
mix all of the non-fruit ingredients together first, so you don't damage your raspberries too much when you mix everything together. Then add your fruit and gently fold to mix.
PreHeat oven to 425 degrees.
Basically, you use your favorite pie crust recipe (just for one crust). Roll out into a rectangle shape (or small circle, just as long as it could fit on your cookie sheet). Flip onto a cookie sheet. Pour your filling into the middle. Flip the edges of the tart up and onto the filling with a knife (a flexible one is helpful, like a frosting knife). Make sure that any holes on the bottom edge are pushed back together with your knife or finger -- otherwise the syrup will ooze out. Once all of the edges are flipped up and over onto the tart, put a few thin slices of butter on top, sprinkle with a little sugar and pop it in the over for 25-30 minutes until the filling is bubbling and the crust is golden. Cool slightly (so the filling isn't too soupy) and EAT. Yumola. So good. We serve with vanilla icecream. Enjoy!
Sunday, June 28, 2009
Homemade Strawberry Jam!
Although I have two strong rows of strawberry plants this year (second year), they didn't produce enough all at once to support a jam harvest. So, on Friday my Mother (aka: Grandmama), Sister-in-law Tanya and all of the grand kids gathered for our third annual strawberry picking extravaganza.
Ripley was the chief eater in the group and managed to put about ten strawberries into his basket. The rest went into his belly.

Grandmama continued her custom of helping to fill her grandchildren's baskets ... which promptly get consumed. In years past she's likened the experience the feeding baby birds. "Put one in my basket Grandmama. Put one in mine."
Doesn't Rosalie look adorable in her bonnet?

Reese Bow. Another champion consumer.

Benjamin was a great help and managed to fill up 1/2 of a large basket before he decided he'd had enough. Of course there were plenty of strawberries consumed.

Notice Ripley .... CAUGHT, red handed! Quite literally.

I made three different varieties of jam last year. My favorite by far was a recipe adapted from the book How to be a Domestic Goddess, by Nigella Lawson. It has balsamic vinegar in it, which sounds odd, but trust me, it was the best by far. Love. Love. Love. So, I made a truck load. 14 Pounds of strawberries, already hulled, might I add.
Sugar is a very important ingredient for preserving jam. Initially I thought I'd cut back the sugar content, until I learned that the ratio of fruit to sugar is very important. The exciting thing is that Fannie Farmer says that "honey may be substituted for up to one-half the sugar in the recipe". So, one day when I have honey (if the sun ever stays out long enough) I will be able to use some of that! Exciting!
Here is the recipe:
Strawberry Jam
7 lbs. strawberries, hulled
8 Cups sugar
1 lemon, juice and zest
1 1/2 T balsamic vinegar

Much to my chagrin, I have a ceramic top stove. If you do any serious cooking, please steer away from these. The clean up aspect may be tempting, but at least my circa 2001 version takes much longer than a traditional coil electric stove to heat water. No contest. It's possible they have improved the technology, however, I actually read a warning on my pressure canner that I purchased last year (granted, it looks like a tank) that the weight of it all, plus heat, could crack the ceramic top. Good grief.
In any case, it takes longer than it would otherwise to reach high temperatures. Fannie Farmer says that the "jelling point" for strawberries is 238 degrees. Reaching this temperature will help you to determine if your jam is "ready". For the life of me I couldn't reach this temperature with my ceramic top. I had tinfoil wrapping the pot, the cover on . . . . the highest I could get was 215 degree. Granted, this was a very large batch of jam. Regardless, come to find out, strawberries have a low pectin level so reaching a very firm texture is impossible unless you add in commercial pectin. I am fine with a jam that is less firm than what you'd see in the grocery store.

Here are my jars -- freshly sterilized.
Put your jars in the pot, cover them with water and bring to a boil. Boil for 20 minutes.

All done. Yum. Yum. Yum.
I didn't sterilize enough jars for all of the jam I had. I was two jars short. So, that jam went into clean jars that I then put into the refrigerator.

Tuesday, June 16, 2009
Garlic Scape Pesto
What on earth is a SCAPE? I didn't know either. And who came up with that name? Anyway, I have them. Scapes are the flower stems that garlic plants produce just before the bulbs mature underground. If you are growing your own garlic, as I am for my first year ever, it is a common practice to cut the scapes off in order to boost the growth of your bulbs. It's wonderful because it is one more thing that you can harvest from your garden at this early point in the season when all there is, is lettuce, peas, strawberries, rhubarb and last fall's kale (which, is not too shabby an assortment, I must say).

Some say to cut your scapes off before they make a full loop, others say wait until they've made two loops. I split it down the middle and trimmed them off after about one loop -- give or take -- and enough to make my first batch ever of Garlic Scape Pesto. Aren't they a bit odd looking?

To make Garlic Scape Pesto, you pretty much follow your favorite basil pesto recipe and in place of the basil, use the scapes. The recipe I adapted from called for a pound of scapes. My first harvest was just shy of that.

Here is the recipe I ended up with:
Before you start, put water on to boil with 1 T of salt.
Garlic Scape Pesto:
1 lb. of garlic scapes, chopped just a little bit so you can cram them into your food processor.
1+ cups of freshly grated Parmesan cheese - first I use the grater attachment, then the attachment that looks like a propeller so the cheese is chopped fine.
1/4 cup toasted or roasted pine nuts, chopped. I toast them in my toaster oven until lightly browned. My brother (a pesto fanatic) roasts them in a pan over the stove.
2/3 cup extra virgin olive oil, or so.
Juice of one lemon (I only had 1/2, but it would have been better with a whole.)
Pinch / Dash of cayenne pepper
1/2 t salt, to taste
plenty of freshly ground black pepper
(I didn't have any basil leaves on hand, but if I did I would have added about 1/4 cup of them just to accent the garlic scapes. You would add them at the same time as the scapes.)
If you want, you can dump everything in together and just pulverize until everything is in tiny bits -- it's fast and easy. But, I don't love the way the pine nuts and the Parmesan cheese get pasty when I do that. So, first I grate the cheese, set aside. Chop the pine nuts with a hand chopper, set aside. Put the garlic scapes, lemon juice, cayenne pepper, salt and pepper into the food processor and chop until the scapes are finely minced. Then, slowly drizzle the olive oil into the food processor while it's running. Run the food processor for about 10 seconds. Personally, I like to mix in the Parmesan cheese and pine nuts in by hand (so things don't get pasty), however you may be content to dump them into your food processor pulse it a few times just to combine everything.
Some folks swear by putting a ladle of pasta water into the pesto before tossing it with your pasta. This makes the pesto stick nicely to the pasta. Sprinkle with Parmesan cheese.
This makes a good amount of Garlic Scape Pesto. We cooked a pound of pasta and still had some pesto left over. It was delicious. Victor, my food critic, said that it was very good. And then added a few minutes later that it was really, very good! Enjoy.
Friday, May 29, 2009
Tonight is Pizza Night!
I made these two pizza's below a couple weeks ago with my pizza dough recipe. The recipe makes these two medium sized pies. Tonight I think I will make a double batch for more left overs! You can start making this dough at 3:00 and it will be ready for dinner. Or make it the day before and put it in the fridge, like you see at the grocery store in the dairy section. Or roll/stretch out four individually sized pies, then stick them in the freezer so you will have them handy.
What is the odd looking right half of the pizza pictured below, you ask? Well, the photo doesn't do it justice really. But let me tell you .... it's scrumptious! Recently at a friend's house I sampled this pizza and immediately started making plans to recreate it at home. Okay, okay, what is it?!
It's caramelized onions, crumbled blue cheese and fresh rosemary. Delish.
This is what I did:
Slice thinly 2-3 large onions and saute in olive oil and 1-2 teaspoons sugar on medium-low heat until soft.
When your dough is stretched and ready, put on the caramelized onions, sprinkle with crumbled blue cheese (spotty, not covered) and fresh rosemary leaves. Then bake. Sooooo good!
For the boys it was pepperoni from the deli with cheese. Victor and I also love pepperoni and fresh spinach -- I still had some from our garden, so I tossed it under the cheese. Yum.

I've been struggling to peacefully get my pizza dough onto my pipping hot pizza stone without major mishaps recently. I do the whole cornmeal on a wooden cutting board thing - then shake-scoot the prepared pie off onto the hot stone. But sometimes it sticks, sometimes it slops over the edge of the stone dripping pizza goo over the sides into the oven ... So what I've been doing that's worked better for me is turn on the oven and heat up the stone, stretch the dough on the counter, then open up the oven, pull out the oven rack as far as it will go, sprinkle cornmeal onto the hot stone, then lay the stretched dough right onto the stone -- you will be able to scoot it around a bit on the cornmeal to make a nice shape. If I'm adding something wet like marinara sauce I'll let the dough cook about 2 minutes before opening up the oven again, pulling the rack out, then adding the marinara, cheese, etc. then, cook the pizza until done.

Thursday, May 7, 2009
How to cook Kale

I have about four Siberian Kale plants that have overwintered in my garden (I guess that stands to reason) and have sprouted beautiful new leaves. I can't bring myself to pull them up, they're flourishing. So, last night I decided I'd cook a big batch up and see how it tastes. It was fabulous!! Here is my favorite recipe for brazed Kale with garlic and onions. Last night I had it for my main meal and added in tofu and eggs. I'll give you all of the gory details:
Braised Kale
One very large bunch of Kale. Washed and leafless portion of the stem removed.
1-2 large onions, cut in half and sliced thin
5-6 minced garlic cloves (fresh please)
olive oil, drizzled in the bottom of a deep skillet
red pepper flakes (several shakes, more if you 'like spicy'!)
salt and pepper to taste
for 'main meal' Kale also add:
1/2 block of extra firm tofu, cubed
2 eggs, beaten
Directions:
Boil a large pot of water with 1 T salt in it. When it's ready, throw in your kale and boil for 5 minutes. Strain and set aside. (This is all happening while you're cooking the other part)
Meanwhile, mince your garlic and slice your onions.
Drizzle olive oil in the bottom of your deep skillet, enough to put a thin layer on the bottom of the pan. Turn on the heat to medium low.
Toss the minced garlic into the pan. Cook until soft. Add in the onions, turn up the heat to medium high. You want the onions soft and a little browned, more like Indian cooking. Toss around often.
Add salt (start w/ 1/2 teaspoon) pepper and red pepper flakes.
When your onions are golden around the edges, toss in your Kale and maybe a little drizzle or two of olive oil to be sure things don't stick and can 'braise'. Keep the heat on Medium High and toss. Taste and adjust your seasonings.
If you having Kale as your main meal, (or if you just want some extra protein) add in the tofu.
Clear a spot open on the bottom of the pan, drizzle a little olive oil, then dump your beaten eggs on top of the oil. Let the eggs firm up a bit on the bottom before stirring them a little. Repeat until the eggs are cooked, then give the whole thing a big toss. Taste and correct your seasonings.
Yumola! You're done!
Friday, May 1, 2009
Bees, Baseball and Pizza Pie
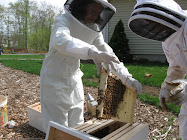
Before I get to the nitty-gritty of going into one of my hives yesterday, let me first present to you my adorable assistant Ripley. Can I just tell you that this was his natural pose? I just told him I was going to take a picture -- and this is how he stood. He loves the camera, just like his Avo (Grandfather in Portuguese). I had to go into my hives in the middle of the day, so Ripley was around. I just had him sit by the garage at a safe distance away. He really didn't need the whole get-up, but he was eager to have a bee suit like his older brother. So, I got out a white dress shirt and Victor's veil and -- Voila! Pleased as punch (as you can see).

Now, the nitty-gritty. Yesterday's task was to go into each hive and check to see that the queen had gotten out of her cage through the soft candy plug (consistency of salt water taffy - but not stretchy) that I'd already poked a hole into with a large nail to help her attendants dig her out. If she was still in there, I was supposed to pry open the cage (over the hive, so as not to lose her!), set it down on top of the frames and watch her crawl out. Although she can fly and all, that's really not her main thing. Unless you drop her or squash her, she will happily go into her hive to do her work. These honey bees have a mission. They have work to do! The other thing I knew I'd probably have to do is take out / off some burr comb, which is comb that the bees build in areas they are not supposed to. They will fill up any open spaces with comb. Because of the queen cage, my frames were askew so I knew this was a possibility. Okay, so that's what was supposed to happen.
Now, let me tell you what did happen. I got myself and Ripley all suited up. Ripley took his safe place back by the side of the garage and dutifully sat down and watched. I told him, no talking or moving. He's a very mellow reliable 4 year old from that perspective. Check. Got my smoker stoked and lit. I don't know how good a job I did with it. The thing is, all of these tasks are so foreign and new. Every move you make feels like you've been plunked into Saudi Arabia (a country with a foreign language and culture I've never been to or experienced first hand) and are expected to function properly. So, I got all of my props - hive tool, bee brush, smoker, more fuel for the smoker (pine needles) and I went over to the right hive (still need names, any suggestions?).
You always approach your hive from the side so you're not in the line of traffic (bee line? :) ). Did that. Check. I puffed smoke from my smoker into the entrance and then as calmly as I could muster I took off the rock, the lid, the top box and feeder. There were bees sucking away at the sugar water in the feeder -- not knowing what on earth to do (being a skittish novice) I just slowly put the thing down and hoped they crawled out. At the time I didn't even think to put it on the ground right side up, or to bee brush them off. Can you say overwhelmed? And I hadn't even opened the actual hive body yet!
So, then I went about taking off the "inner cover" which is this thin (5/8"?) top that covers the frames where all the bees are busy in the frames. When I lifted that cover off I immediately felt and said quietly out loud "Oh my gosh, I don't know what I'm doing. I have no clue. What am I doing in here?!" (Not to mention a few unmentionable sentences.) So much for positive thinking and positive 'self talk'. You can read all you want and go to every single bee class (like I did) and still feel totally inept and overwhelmed at opening up that hive. In reflecting on it, I think the thing is -- it's simply unnerving to go into a buzzing hive of bees at first. When I pulled the inner cover off there was this large piece of burr comb stuck to the underside of it. It looked like the dorsal fin of a dolphin -- every millimeter of it was packed with honey bees. I just froze. Okay, now what? What to do? I grabbed my smoker and puffed a few puffs into the hive and onto the comb. Not one bee moved. Okay, now what? Uhhhhh, pry off the comb (which is very easy to do, no 'leverage' required). I got out my hive tool and pryed it off so that it dropped gently on top of the frames with the other bees. Then, I placed the inner cover on top of the other box to the side. I turned back to the hive and slowly picked up the burr comb. I tried to give it a little shake. Nothing. All bees stayed put. Again, not knowing what to do, I decided to grab my bee brush, which looks like a very soft, long 'haired' dust pan brush. I brushed the bees off. That worked just fine. But the bbbbbuuuuuuuzzzzzzzzinnnnnnggg got louder. They didn't like being brushed. Who would, right? Even Benjamin and Ripley complained. I puffed the hive with a little smoke. (maybe I should try that with my boys?) I don't know that the smoke did anything . . . it was effective when I had 2 or 3 bees come at me -- granted I had the full on bee suit so they couldn't get to me if they tried, but I smoked them away anyway.
I put the burr comb to the side and then looked at the queen cage wedged in between the frames. It was packed with bees all over the outside of the cage. They want their queen out! I could see that the hole was bigger. I held onto the little cage and pulled it out. I could still see (sort-of) through all of the bees clinging to the outside of the cage, that there were still bees inside the cage. I didn't know what to do. I felt like the hive was already mad at me, even though I felt like I'd done what I was supposed to and I didn't know if I should proceed. I was supposed to pry the little wire mesh off the cage and allow the queen to crawl out . . . but the thing was covered in bees. I shook it. I smoked it. Nothing. I just didn't know if I should bee brush them off. They were teeved at me as it was. Can you bee brush the queen cage?? That will really get them mad (I guessed). No knowing what to do. I just buttoned that hive back up. I put the queen cage back in it's place with all of the bees crowding on it and closed her up. It's one thing to not know how to bake bread and to get through it by trial and error. It's a whole 'nother thing to go into a buzzing hive and feel clueless. Overwhelming.
I immediately called my friend Diane the beekeeper and talked her ear off. Poor gal. Thank God she's a nurse. She calmly talked to me about the whole mess and encouraged me and told me (in the end) to try going in tomorrow. I took that advice and ran with it! After the fact I felt like I'd accomplished nothing and had been a complete and utter failure. I've never done drugs, hardly ever take even aspirin -- but I was thinking that right about then a Valium would have been helpful. I was a mess.
In hind sight, and thanks to listening and encouraging friends, I can see that I did learn something by going into my hive. This was my main accomplishment. Learning. But it was tough unnerving learning. Unsettling. The bottom line was not knowing what to do moment to moment. When Diane had been by my side during the install, I was totally calm. I felt comfortable even! And there were many more bees just flying around not knowing where they were or where to go. Fear of the unknown. Like walking into Junior High for the first time, but with more bbbbuuuuuuuuzzzzzzzzziiinnnnggggggggg.
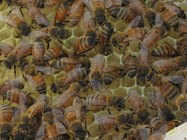
And, I also removed a large piece of burr comb. Deep in each cell glistened fresh nectar (or sugar water) that the bees had put there. Here it is. Neat, huh? Today I am going in again. Pray for me.
Incidentally, I asked Ripley afterwards if he found watching overwhelming or fun and interesting. He said "fun and interesting". So, that's good. At least he enjoyed it.

On a completely different note, Ripley had his very first T-ball game last night. There was a mix-up with his uniform shirt, so he didn't have one, but thankfully that didn't bring the tears. I was worried.

Here he is in the outfield at the ready -- in the white shirt.

Here he is glowing on third base -- having the time of his life.

Afterwards, I made two variations of asparagus and goat cheese pizza. I didn't have a recipe, so I was winging it. It was very yummy, but I don't know if it was 'perfect'. The first one has garlic and olive oil on the dough -- I cooked that for a few minutes, then added the asparagus. Cooked it for a few minutes, then added the goat cheese and red pepper flakes.

This one I put a thin layer of red sauce on the dough. Experimenting with pizza is a lot easier than experimenting with honey bees - - just so you know.

Saturday, April 4, 2009
Homemade Ravioli
Homemade Butternut Squash Ravioli Recipe with Sage Garlic Butter Sauce
Let me start out by saying that my husband Victor has a very discriminating palate. He loves good food. When I make something he really likes that is superior he says "OOohhh! Oh! Oh!" Sometime he might even throw in "This is incredible." Well last night when I finally gave him his bowl of Homemade Butternut Squash Ravioli in a Sage Butter Sauce, he not only said that it was "Oh Oh Oh Incredible!", but he also thought it was better than Federal Hill - - The Italian district here in Rhode Island. So, that's a pretty good review.
Now, having said that, making ravioli is a bit labor intensive. I don't have any pasta making tools like one of those roller - slitter things. And I don't have one of those cute ravioli trays I've seen at William Sonoma. These things may have made things go more quickly. But, I will say that making ravioli is faster than making pasta (like linguine) completely by hand without special tools. When you make ravioli, pour yourself a glass of wine, maybe have a girlfriend over, chit-chat and enjoy being in the kitchen. If you hate cooking and the kitchen, forget this recipe. Now, on to the good stuff!
First: Cut a butternut squash in half put it face-up on a lightly oiled cookie sheet and roast it in the a 400 degree oven for 30 minutes, or until soft. Scoop out the soft part and puree using a blender, food processor or food mill. I already had some reserved in the freezer -- so that was one less thing for me!
Homemade Pasta Recipe:
(this is doubled and made enough ravioli to serve 4 adults, plus a little extra dough)
1 1/2 C semolina flour (many recipes didn't call for this, but it's more "Italian")
1 1/2 C unbleached flour
1 t salt
4 eggs
4 T water
4 T olive oil
I took the suggestion from a good old favorite "The New Basics Cookbook" from the Silver Palate ladies and whipped up my pasta dough in the food processor. This was a terrific technique. Fast and fabulous. (otherwise you have to knead the sticky stuff) Put the flours and salt into the food processor. Put the eggs water and olive oil in a pitcher so that you can pour it all into the food processor while it's running. Turn on the food processor and gradually add the wet stuff for 15 seconds. Turn it off. That's it. Dump the dough onto a floured surface and work into a ball. Let set for 30 minutes so the flours absorb the moisture.
Meanwhile make your ravioli filling.
Butternut Squash Ravioli Filling Recipe:
2 cups roasted and pureed butternut squash (you could use more, that was what the original recipe called for -- or save the rest in the freezer for the next time, or for pumpkin bread!)
1 1/2 T sage (I was able to use the sage I dried last fall, ground.)
1 onion minced
4 garlic cloves minced or crushed
Olive oil -- drizzled all over the bottom of the pan -- a few T's
Freshly grated Parmesan or Romano cheese, about a 1/2 - 1 Cup mound with the micro grater.
Salt and Pepper to taste
Drizzle olive oil in the pan. Add onion and garlic, cooking until translucent (you don't want crunchy onion in your ravioli). Add in salt, pepper and sage. Add in pureed squash. Let everything simmer for about 5 minutes to let all of the flavors mix together. If it gets a little dry just drizzle in a little hot water from the tap. Then, stir in the grated cheese. Put the whole pan in the fridge to cool.
Now onto the pasta (are you still with me?)
Take about 1/3 of the pasta dough and roll it out on a well floured surface. I once heard Martha Stewart explain that when you roll out dough, only roll in one direction -- turn your dough, then roll out again. This prevents the dough from sticking -- and it really does. You want the dough to be so thin you can see through it. Believe it or not, it holds together. The semolina flour in particular is supposed to make it stretchy.

On one side edge of the dough put about one teaspoon of filling 3/4" apart. Cut a strip lengthwise so that you can fold the dough over in half. I used a pie wheel (I don't know the technical term) to cut my ravioli so they had the 'rick-rack' edge.

See the little lumps of filling? After you fold the dough over, trim off any extra dough on the outside edges (you can use the scraps the next time you roll out the dough).

Then cut out each ravioli. You could do this with a pizza cutter or a long knife too (don't drag the knife -- just press).
 Then take a fork and seal all three edges by pressing lightly.
Awwwww . . . aren't they cute? Put them on a piece of waxed paper (at least that's what I used) to dry for 10-30 minutes (I did 30).

While you're waiting for them to dry, make your sage butter sauce which is very straight forward.
Sage Butter Sauce Recipe:
This was just my own invention, because I couldn't find an exact recipe in my books on the fly. How hard can it be? Right?
1 stick of butter or 4 T butter and 4 T olive oil
2 T sage, ground in a mortar and pestle.
8 garlic cloves, crushed (or as many as you have the patience to peel)
Salt and Pepper to taste.
1/4 C white wine would be nice too (I'm thinking), but I didn't have any on hand.
Melt butter & drizzle olive oil (if using) in the pan. Add crushed garlic and cook on low heat until it's translucent. Add in the sage, salt and pepper. Add in the white wine. Simmer a little while but don't let the garlic brown. Turn off heat.
Now you're ready to boil your cute raviolis! Salt your water (1 T) and put in as many raviolis as you think you can handle. Next time I might try more, but last night I only put in about 8 at a time. They only cook for about 1 minute 30 seconds. Remove with a slotted spoon and put into the sage garlic butter sauce.

Because I was concerned that the ravioli would break up if I "tossed" I just flipped them like pancakes to give each ravioli a light coating of the sauce.

Then, top with Parmesan or Romano cheese and EAT!

Truly incredible, if I do say so myself!
Yumola!
Monday, March 30, 2009
Around the house this Weekend
On Friday and Saturday this weekend the sun managed to find it's way out from behind the clouds and gave us days in the 50's and 60's. How wonderful. Both of my boys have decided that spring is here and have been insisting that they don't need coats and want to wear short sleeves. Who can blame them?
This was Benjamin and Ripley playing outside after school on Friday -- inventing contraptions.

Checking the inner-workings of the 'vehicle'.

On Saturday morning the boys got to work outside before I'd even finished the breakfast dishes (pancakes . . . but more on that later). There were eventually some meltdowns and arguments, but when I took this picture I was so proud.

The leaf collection method was their own invention.

On Saturday, in the mail, I received my seed potato order. It's obvious that when I ordered them I was lamenting about the harvest I had last summer, because I ordered a LOT of seed potatoes! Yikes. I am planning on putting them in various potato towers, rather than in the ground this year. We'll see how they do!

Varieties: Yukon Gold, Red Sangre, German Butterball, Bentje -- That'salota potatoes!

I know you're tired of reading about all of my leeks at this point . . . but I harvested a hum-dinger on Saturday for a potato casserole dish. Isn't she pretty?

I read on someones blog that you can plant the root part of the leek and it will sprout to form a new leek. So the past few harvests I've saved the root and put it back in the ground for fun. We'll see how it works. I'll keep you posted.

We have a new favorite pancake recipe. It's from the King Arthur Flour Baker's Companion, which if you don't have it, it's really a baking bible and everything I've tried so far has been excellent. They also do a great job educating you about the small important details of baking, which I have found to be very helpful.

The bacon, incidentally, is from a local Rehoboth farmer.
They raise their own cattle and pigs.
 Zephyr Pancakes (24 3 1/2 inch pancakes)
Mix all of the dry ingredients together:
2 C flour
2 1/2 T sugar
1 1/2 t baking powder
1 t baking soda
1/2 t salt
Whisk together all of the wet ingredients:
3 large egg yolks
1 1/4 C heavy cream (I used whole milk)
1 1/4 C buttermilk (I used whey from my yogurt making)
2 T butter, melted
1 t vanilla extract
Whisk the wet ingredients into the dry, just until combined -- it's okay if there are a few lumps.
Scoop out with a 1/4 cup onto a preheated, lightly greased skillet. Flip. Eat. Yum. Yum. Yum.
(I have to admit that this last time, I wasn't careful with my liquid measurements and added too much -- so the pancakes weren't as fluffy as the last time. But, they were still tasty!)
Subscribe to:
Posts (Atom)