Thursday, April 30, 2009

How does my Garden Grow?

Here is a tour of what is happening around the yard. So many exciting things! The weather here in Massachusetts has been unseasonably warm, so all of the plants and trees have kicked into high gear. I've enjoyed three solid days of working outside in shorts and a t-shirt planting and weeding. I realized just now that I forgot to take pictures of my fruit trees that are flowering -- the cherry, peach and plum trees! Apple, apricot and early blueberries are ready to burst into bloom. 

Meanwhile . . . 
My garlic plants have grown! Don't they look fabulous? I'm dying to know what is happening under the soil, but don't dare to disturb one bulb. Besides, there isn't much to do at this point, right?
Here is one of my very happy 2nd year kale plants. I'm going to make a meal out of these leaves to see how they are, I'm guessing they aren't as tender? 
Ahhhhh . . . my asparagus bed. Do you see all of the shoots standing up tall? With the warmer weather we have had a full family serving every other day. That'salota asparagus!
Aren't the cute??
Amazing . . . and unusual plant. Don't you sometimes wonder how we started to eat certain things as human beings? I assume that people observed animals eating things and decided that they might be worth a try. Or, who was the poor soul who discovered that rhubarb and potato leaves are poisonous? That was not a satisfying meal!
Peas. I've heard two 'rules of thumb' on when to plant peas. 1) Plant when the crocuses bloom. 2) In our area, plant on Saint Patrick's Day. I love these home spun rules because they sound like something passed down from your grandfather around the breakfast table. "Ya know Lillian, I always said we gotta get those peas out when the crocuses bloom."
My remaining Leeks have become enormous! Time for some leek quiche! Ooooo . . . leek and asparagus quiche! As Victor would say "NOW were talkin'!"
Incidentally, I tried planting some 'lazy leeks' on the outside of our garden fence just for fun to see if they worked . . . and they did! Basically, you take the root bottom of a leek (even the ones you buy at the store) and plunk them in the ground. They should start to grow up. Interesting. The spot I've stuck them into is horrible for leeks, as they like well drained soil and this stuff here is like clay. Oh well. Just an experiment. But I might try a few more for fun! 
Look what I found! Blossoms on my strawberry plants! Now THAT'S exciting!
As you can see, our strawberry bed is much happier since installing our fence. So far, the rabbits are at bay. When the sprinkler guy came by to make some repairs (try as we did not to puncture the hoses . . . we did) he was flabbergasted by the seriousness of our fencing. Whatever it takes to keep those nibbling cottontails out of my strawberries and carrots! (We also protected against tunneling whippersnappers, just in case.)
And speaking of strawberries . . . my rhubarb has gone wild. In short order I should be able to cut some to make a pie. Can't wait. As you can see, I will have plenty for making jam, pies and whatever else you can do with rhubarb. 

Happy Rhubarb.
Here are my potato towers. You can read about them all over the web as a way to grow potatoes in a limited space. I have that gardeners disease where I always feel short on space and always want to expand. So, I thought I'd give these a try. Basically after making the wire cylinder, you fill the bottom with compost, old leaves, old grass clippings, ash is supposed to be good for PH, I threw in a little straw, a little dirt. THEN, you plunk a few seed potatoes on top of the six inches of compost cocktail, then put another 3 inches on top of the seed potatoes. When the potato plants push up through the compost, cover with more compost and continue doing this until you reach the top of the tower. Then harvest when the plants brown and die off. I'm a little concerned that potatoes will be exposed to light with this set up -- because this is what makes potatoes have a green skin and that's not good for eating. If I have to, I'll put some type of paper around the outside. We'll see. Of course my Portuguese husband thinks I'm nuts.(The Portuguese people know a thing or two about potatoes!) And he's teasing me about what his father will say when he sees my towers. Lets just hope I prove them wrong -- otherwise I'll never live it down! :)
My lilacs have sprung open. I adore lilacs. They are one of my favorite flowers. I have two, now enormous bushes. Three different colors, so they all spring open at slightly different times. This year, with the wacky weather they are all opening at once. Aren't they lovely?
An overview of my side and back yard where my garden is -- before everything is thick and lush. In the foreground is my perennial bed. Last year I started pushing into this with my herbs. So, the front part towards the road is packed with flowers, the back part -- herbs.
Our wild blackberry patch is starting to come alive!
And here is my new raspberry plot all planted. Not much to see just yet, but hopefully they will be! Only the everbearing variety I planted (1) will provide any fruit this summer. The summer raspberry fruits on one year old cane -- so I have to wait until next year. That's okay, I'm getting used to it!
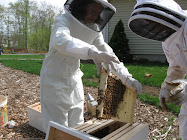
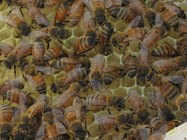
And here are my bees in the afternoon. Yesterday, when I took this photograph, it was cooler than the previous 3 days so there was less activity. But they were still busy. In the afternoon they all start settling in and coming inside. 

Today I need to get suited up, start up my smoker and check to see if my queens have gotten out of their cages. Two friends who have new hives had burr comb because of how the frames are pushed all to one side to hold the queen cage between two frames. If given extra space, the bees will put 'non-approved' comb in that area. Usually this doesn't happen in just 3 days, but I'm planning on having it since two folks I know had it when they checked yesterday. Burr comb must be removed because it will prevent you from being able to remove the frames to check on your bees -- they will bind that whole area up. So, I'll have to smoke the area to get the bees off and 'quiet them' then pry off the burr comb with my hive tool. Make sure the queen isn't in it. Smoke / shake any remaining bees off it -- then get rid of it. And I was hoping for an easy intro . . . you know I'll tell you all about how it goes today! 

Monday, April 27, 2009

Good Morning Special Bees!

Even when I was in the midst of my bee class I couldn't understand why people said that new bee keepers have to hold themselves back from going into their new hives. Because a new keeper would be so inexperienced I reasoned . . . why be so eager to dig into a bee hive??! Crazy. Leave well enough alone, I thought. But now I can understand why. The first thing I did this morning was open the front door, grab the newspaper and walk around the side of the house to check on my bees. (I didn't go in the hives clad in my pajamas, mind you. I just looked at the outside of the hive.) I am happy to report that at some point yesterday evening they tucked themselves in. There was not one single bee zipping around the hives. Awwwww. Now hopefully they will get busy pushing out any dead bees and building their comb. Exciting! On Thursday I will check to be sure that the queen has managed to get out of her cage. In a week, I will be able to go into the main body of the hive to see if the queen is busy laying eggs! I'm looking forward to it.

Sunday, April 26, 2009

My Bees . . . at Last

Today was a wonderful day! We raced off to church this morning, and after some catching up with friends, came home and got to work outside in the record breaking 87 degree weather in Massachusetts. Lovely. I planted my three different varieties of raspberries: Encore (summer fruiting late), Polana (everbearing), and Killarney (summer fruiting) in the new spot we had created along our side yard. Victor tidied up the area in the back yard: consolidating our leave, grass and yard clipping compost piles, piling up large rocks for later use, and piling up cut wood from a few trees we dropped to make room for future garden area and to provide sunlight for our coming hens. With a little help from me, Victor removed my cold frames from the garden. I have cold weather loving greens ready for consuming -- from Kale to Romaine! Victor also sunk a baby pool into a mulch area along our house that will be 'fed' by a water spout from our gutters -- for our new BEES! Yes, the bees are here and they need a water source. Did you know that bees drank water? Yep. They do. 

So, do you want to hear about our new bees? Well, I want to tell you. I hope you'll bear with me as I fill you in on all of the gory details. It was quite a moment for us -- albeit a rather brief one, really. In less than an hour we suited up, got organized and hived our packaged bees. 

Here is Benjamin who was eager to get up close and personal with the bees and excitedly suited up in his new Bee Suit. I am so excited to hand this craft down to Benjamin -- do with it what he will. No one can take that knowledge, experience and maybe even a love for it away from him. 
My friend Diane has been keeping bees for over 4 years and now has 8 hives at her small farm where she has a substantial vegetable garden and grows pumpkins for sale. She picked up my bees for me yesterday while I was returning home from Florida, and was a dear and oversaw my first install. Like me, when she installed her first hive she hadn't seen a hive in action or anyone 'work their bees'. It was a great comfort to have someone there to guide and reassure me. Thank you. Thank you. Thank you, Diane!
This is how the bees look in their 'packages'. This is a 3 pound box of bees, which I learned recently contains about 10,000 bees. Victor and Benjamin had a hard time believing that. I was too busy concentrating to check for reasonableness. (As you can see from the above expression.)

Before you fiddle with the bees, you spray them with sugar syrup. This keeps them busy grooming themselves while you take off the flat piece of wood covering the top, remove the what was an empty can of sugar syrup, remove the small matchbox sized cage with the queen and a few 'attendants' in it, then dump all the bees in the hive. Someone said that the bees haven't established a home yet to defend, so they aren't organized and as defensive as they would be in their proper hive. Surprisingly, no need to get out the smoker. 

One three pound package of bees:
Here is Benjamin looking on.
Here you can see I've pried the slim piece of wood off the top of the package so you can see the can of sugar water. It came out easily with my hive tool -- which according to Diane, is a handy tool for many things! 
After I pried out the can, I pry off the queen cage which has been stapled to the package by a piece of strapping. The queen cage needs to be pulled out and set somewhere. For the first package, I set the queen cage in the bottom of the hive. For the second package, I shook the cluster of bees off the cage and placed it on the ground beside the hive. 

This is the first package. I'm holding the queen cage. See all of the bees clinging to the cage? Those bees want to be near and care for their queen. Loyal subjects. 
Here is the queen cage setting on the bottom of my hive, just temporarily.
Now, when I read about this -- and heard about it in class, I couldn't believe it. You take this box of honey bees and bang it on the ground to get them to fall to the bottom of the box. Then, you flip it over and dump the bees into the hive. Yep, that's what I did.
At this point the bees aren't really worried about you too much, but you can hear them buzzzzzing and some of them do fly around a bit. More so than I was expecting actually. But, Diane wasn't worried, so neither was I. (In the picture below you can see the hole on the bottom of the package and the bees dropping out.)
Since there is just one hole in the middle of a rectangular box there is quite a bit of banging, tipping and dumping going on to get as many bees as possible out of the 'package' and into the hive. You can see Diane holding onto the queen cage we had originally set down in the bottom of the hive (just to have a safe place to put her) while she sprays the bees with more sugar syrup. This way the bees stop flying around in the box and can be dumped out more easily.
OK, now that as many bees as possible are in the hive, it's time to deal with the queen. First I had to shake the bees that were clinging to the queen cage off the cage. When you're not used to it, it's a very counter intuitive thing. It just doesn't seem like a good idea. But, they didn't come at me with all guns blazing or anything -- they just dropped into the hive. Diane had a large nail handy. I used this to pry a small cork out of the queen cage, leaving only a thick candy like mixture plugging the hole and keeping the queen and her 'court' inside the cage. The idea is that you want the queen to be released gradually so that the bees get to know their new queen and accept her. The bees are naturally inclined to eat their way to their queen and within about two days she is free to travel into her hive. To help this process along, a lot of people poke a small hole with the nail into the soft 'candy'. This is what I'm involved in doing in the picture below.
Now I am taking the queen cage and wedging it in between two frames with the screen facing out and the candy side up. 
Here I am making sure the queen cage is securely wedged between the frames.
My photographer didn't catch me putting the large pickle jar full of sugar water upside down (with small nail holes punched in the metal top) on top of the inner cover inside the first hive. The top goes on, and the package box is put right by the entrance to the hive so that any stray bees can find their way to be with their friends.
Happy Bee Keeper Sandy, having finished her first hive!
Now, on to hive number two. A few more pictures. Here I am going to pry the can of sugar water out of the package.
Dumping the second package of bees into the second hive. The second time, Diane really stood back and had me do the whole thing. Good teacher.
Sliding the frames back into the hives.
Again, removing the cork plug and putting a hole into the 'candy'.
Here you can see me installing the large pickle jar of sugar water onto the inner cover. Another brood chamber box goes on top of the lower one to enclose the sugar water in the hive. Then, the top goes on and VOILA! Done.
The photographer: Victor, in a veil borrowed by Diane.
Victor has been more excited about the coming hens, but surprised even himself by wanting to see what was going on -- up close and personal. Later in the afternoon when I was looking for Benjamin and Victor, where did I find them? Sitting by the hives, watching the bees. 

There they are! Currently the bees are a bit disoriented and confused. They flew around and around their hives . . . not quite knowing what to think of their new digs. In a few days they should be a lot more purposeful.
After the bees are established and oriented in their hives, they wouldn't be too pleased with this up close visitor -- but at this point they were too busy exploring the new home to be concerned with Benjamin. I may have a future bee keeper on my hands. He wanted to keep his suit on so that he could watch the bees up close. After awhile, I told him to give the poor bees a break and back off. When he had one crawling around on him like a pet (after the bee suit was shed), I informed him that it was a drone (male bee), and that drones don't sting. He had a great old time with that fat bee after that! Benjamin thought he was pretty cool.
Ripley (who was napping during the install) getting a tour from Benjamin. The boys stayed outside for a long time just watching the bees, while Victor and I got dinner ready. As evening approached the package boxes were empty and almost all of the bees were snuggled in their new homes. However there were several who were instinctively jumping into their work . . . 
the seven short boxwood bushes (previously only inhabited by yellow jackets, bumble bees and wasps) were buzzing with my new honey bees! Tons of them! Isn't that exciting?! They were moving around like mad, so it was tough to get a good shot. Finally, I caught one of them.

Home Sweet Home

Yesterday someone told me a story about my Grandmother (on my Dad's side). She said "Do you know the best part of going on vacation?" "What?" They asked. "Going home." my Grandmother said. Well, amen to that. 

I have so many exciting things going on at home, I couldn't wait to get back! And I missed my friends. And Victor too -- he had to leave on Wednesday to do that working thing. 

So last night, the first thing I did when we pulled into the driveway was to inspect my fruit trees. They are starting to blossom! My cherry, peach and apricot trees are out! And perfect timing too! Today I am installing my bees in their new homes! You know I'll be taking pictures for all of you. Because of my hard work before leaving for Florida, my hives are all ready to go. The only thing left to do is to make their sugar syrup -- which must be provided to them because the heavy nectar / pollen flow isn't on yet, and they don't have any honey reserves from which to draw . . . AND they have to make honeycomb for their new hive! 

The second thing I did was to go through to the backyard and investigate my asparagus! Victor had said they were sky high. Well, some were as tall as a foot and a half. I chopped down all of the tall spears and we had ourselves a feast. Asparagus is wonderful with 2-3 cloves of garlic minced on top, olive oil, salt and pepper -- roasted in the oven at 425 degrees for 7-8 minutes. Yum.
I'd also hardened off the contents of my cold frames by leaving the windows in the 'up' position while we were away. They were slightly protected by the box, but still exposed to the chilly night time air. Everything looked happy, especially the lettuce. After a day of traveling and eating less than fabulous food, a late dinner of roasted asparagus and greens with lemon, olive oil, salt and pepper was the perfect thing!
I have so many to do's I can't begin to think of them all! While we were away my raspberry plants came in the mail from Johnny Seeds. Today I will plant those, create my potato 'towers', remove the cold frames altogether from the garden, and oh yeah -- install my bees! All after going to church. It's going to be a full day. I can't wait.  

Friday, April 24, 2009

Fun in Florida

What to do with yet another day in sunny Florida? Usually our time in Florida is spent swimming in the pool, going to the beach, playing games, reading and crafting. Once in a blue moon we'll go orange picking. So, yesterday after two days of playing on the beach, we went to the beach for a shell scavenger hunt. 
The list of shells is a little difficult to see here, but I drew simple pictures of each type of shell we sometimes see here on the Gulf Coast and assigned each one a certain number of points. 
  • One point for any type of scallop 
  • 2 points for a spiny slipper shell (or jewelry box shell)
  • 5 points for an olive shell
  • 10 points for any type of conch shell
  • 50 points for a sand dollar
  • 5 points for a "curly-Q" shell (or Florida worm shell)
  • 5 points for any two "attached" shells
Here are their findings all laid out.
Counting up his points.
Looking everything over with Grandmama.
The other thing that we love to do in Florida is to play "Take Two". Now, there has been a 'copy-cat' game called "Gone Bananas" or something like that, that you can purchase in a toy store. But, if you already have a scrabble game, you are all set. I learned this game from my very competitive pastor of 8 years from my last church (I moved from southern R.I.). That was about ten years ago long before the silly banana game. I don't know who came up with it, but it's NOT JUST FOR KIDS. As a matter of fact, I would say it's best suited for adults, but good for kids ages 9 and up. This game is cut throat, fast paced and F-U-N! You don't have to be a fabulous speller of large flowery words (although that doesn't hurt) because it's a fast game (unlike your typical scrabble game) you don't have a lot of time to ponder over long words. This is how you play: 

You put the whole pile of scrabble tiles in the middle of the table, face down.
  • 1-4 people can use one set of scrabble tiles, more than that use 2 sets of scrabble tiles.
  • Each player starts with four tiles, faced down in front of them. 
  • On the word "GO!" all the players flip over the tiles and begin to build their OWN individual scrabble grid. 
  • The first person to build a scrabble puzzle out of the four letters says "Take Two!" which means that all players take two more scrabble tiles out of the center pile and add on to your growing puzzle. Obviously, with only four letters, sometimes no one can create words. In that case, everyone has to agree to "Take Two".
  • Here is an example of what each person's scrabble puzzle should start to look like. 
  • You continue building your puzzles until all of the tiles have been used up. Whenever a player uses up all of their tiles, they say "TAKE TWO!" and every one must take two tiles.
  • The first person to use up all of their tiles WINS that round. 
  • You go around and check everyone's work. Any errors need to be removed from the puzzle.
  • Each person is scored using the letters they haven't used, against them. Add up the numbers listed on the tiles. 
  • Then, you start another round. Play as many rounds as you like.
  • The person with the lowest score, wins. 
Here is Grandmama and Benjamin checking the spelling of a word. You can challenge the spelling of a word, but the tally of that word will count against you if your challenge is incorrect. If the word was misspelled the 'owner' of the puzzle has to remove that word from their puzzle and any other connecting words and count those totals against them in their score. 

Benjamin is doing the tallying.

This was one of Benjamin's puzzles, isn't it impressive? He is still "in training" but in short order he will be a force to be reckoned with! I'm sorry to report that my mother won this game. I was holding my own for awhile, but then got stuck with a 'Z' (10 points) and several other letters. Drat!
Did I mention this game is also fabulous over a glass of wine?
If you have any questions on how to play, please feel free to email me! It is sooooo FUN!