Are you tired of hearing about my bees yet? It's all so new and exciting to me, I can't help but post about them! A week had past since I went into my hive with my friend and fellow bee keeper Diane to remove large pieces of burr comb and make sure my queens were released safely into their hives. I needed to let a week pass to let them peacefully 'do their thing' and get established with their new queens.
It's been very rainy this past week, but when the sun did come out the bees seized their chance and came out to forage with a vengeance! By Friday morning (finally, a sunny day!) nearly every bee flying into the hive was loaded with pollen in their 'pollen baskets' which are larger hairs on their back legs that they groom any pollen they catch with their body hair on to. It collects in a big clump on each back leg. Here is a bee that I was able to capture on film loaded with pollen. Awwww. Amazing, eh?

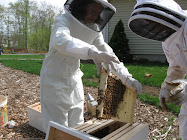
Here is my lovely photographer and encourager Tanya (my sister-in-law) who decided to drop by for a few hours from the 'big city' for some country living. We planned it so she could be there to watch me inspect my hive. Her mother, who lives in California, became a bee keeper last year.

To get started, I smoked the entrance with a few puffs, then the top of the inner cover. A word about smokers. My thought was to be frugal and use what I had laying around the yard as fuel for my smoker. I like this idea. However, when Diane came over last week, she had this cool smoker fuel (like recycled, packed cardboard) that effortlessly stayed lit the entire time we were working both hives. There is something to be said for that. With my homespun fuel, I usually have to relight my smoker a few times. Perhaps this is simply inexperience. Of course, after I was done inspecting my two hives, my smoker was hard at work. I actually had to extinguish the thing because it was smoking up my whole garage!

After removing the inner cover, a few puffs of smoke towards the tops of the frames.

Generally, you remove one frame on the side of the hive closest to you. Check to make sure the queen isn't on it, then set it down (with the bees on it) leaning up against something, near the entrance. This will give you more room to slide the remaining frames in the hive over and lift them out with greater ease. You want to keep them in order. As Diane says: The bees know what they're doing.
 During this hive check I needed to:
- Fill jars with more sugar water.
- Enlarge the entrance reducer to the next size up to give the bees a little more room to come in and out.
- Inspect the frames to find the queen or evidence of the queen (eggs or larvae).
- Inspect the frames to look for evidence that the queen is at work laying.
- Deal with any other issues (I'm learning that the bees like to keep bee keepers guessing and busy!)
As you can see on this frame, my bees have decided to create even more burr comb even though the queen cage is now out and the frames were spaced evenly in the hive. However, now the burr comb is attached to the foundation for the top inch and a half or so! I scraped the parts that were attached to the wood, but the rest of the burr comb stayed put on the wax foundation. The bees had already started putting all kinds of stuff (besides sugar water) into the comb. Not knowing what to do, not thinking that the answer was to scrape at the foundation was the best thing, I stuck the frame back into the hive!

I smoked the burr comb to get the bees off and get a closer look to see how it was attached. I also scraped the portion that was attached to the wood frame off. Before doing that, you should smoke the area.

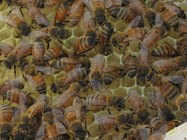
A close up of the next frame I inspected.

When I looked very closely, I could see larvae! Do you see the little cream colored wormy looking things curled up in the comb? This is good news because it means that my queen is at work, and my hive is starting to reproduce and create new baby bees! If you look closely, you can also see a few bees with packed pollen baskets. After I saw this, I was encouraged and closed the hive back up.

Now, on to the left hive. As you can see the bees had created more burr comb. The two center frames were actually attached to each other. Silly bees! I smoked the area then pried them apart.

I smoked the area and scraped any burr comb attached to the wood frame and tried to see how this comb was attached. This too was built out from the foundation and attached on the top inch and a half or so. But not the lower three inches. Again, not knowing what to do, or how I would remove burr comb actually attached to the wax foundation -- I slid the frame back in the hive. I figured I would just have an irregular frame and deal with it.

The GOOD NEWS is, I found the queen in this frame. See her in the middle of the circle of bees? She still has a little green paint on her back. This is how I spotted her. I'm still not very good at distinguishing the queen from a drone. One day. I didn't have an eye for spotting any eggs. They must have been there, but they are very small and the same color as the wax foundation (sort-of a cream color) and hard to spot when you're not familiar with them. I've never seen a 'real-live-egg' before.

This is the frame that the queen was on.
When the bees have drawn out comb on six of the eight frames (I have an 8 frame have as opposed to the typical 10 frame, because it will be lighter for me to lift) I will need to add on another box of empty frames so they don't get crowded. If honey bees get crowded, they will swarm and go to look for a new home. This sounds a little more violent than it actually is. Basically a large group of bees, and the queen (after making several swarm 'queen cells' to create a new queen) leave the hive and hang on a near by tree branch. They send out 'scout bees' to find a new home. At this point, it's possible to collect your bees into a cardboard box and start over. But, honey production is greatly reduced. And let's face it, who wants to collect a swarm? But, it's not like in the cartoons where a large group of bees flies around in circles chasing people in the shape of an arrow! All they want is a larger house.

I filled up my jar of sugar water a good distance away from the hives so that I didn't attract any additional ants. As you can see, my hives are at the side of my house by the garage. This has worked out very well. The garage has created a little 'ramp' for the bees flight pattern to they fly UP and out rather than straight across and in our foot path. Some people put up small fences for this purpose. The trees on the other side create a barrier so the bees don't fly straight across into my neighbor's foot path. They fly up and out.

I smoked the entrance again in order to enlarge their entrance one more step. They got a little rowdy at this, but during the entire inspection I didn't have one bee fly up onto my veil and I didn't see any 'butts' up in the air telling me to 'get lost'! This means they were happy and calm. Good little bees.


3 comments:
Great post! I love vicariously checking on your bees with you. It will be interesting to hear how the hives do in comparison with one another - that's been a big learning curve for me (nice to have more than one hive - both to compare and share the wealth, so to speak).
Love your whole blog!
kpeao
Thanks for the compliment!
Yes, two hives do give you two times to practice and comparisons . . . however I have to admit that during my first 'solo' inspection I was wishing I only had one! It was all so intimidating and overwhelming at first. I am getting more and more comfortable with each inspection!
You know you're a real beekeeper when you utter the following sentence aloud: "YAY!!! I have LARVA!!!" Ew. Congrats on your hundreds of very-near-future babies.
Post a Comment