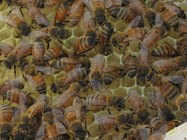
Goldline Honey Bees.
The Queen (in the middle) and her court.

In the warm months, the life cycle of a worker bee is six weeks. So the package (or box) of bees that I will be getting through my bee club will only live for less than six weeks. The queens I have ordered separately through our bee club from are from Purvis Brothers in Tennessee (Purvis Brothers is supposed to be a very reputable company. My bee club is very picky). They are called Goldline. The queens go on only one "mating" flight in their lifetimes. So when I receive her, she will already have eggs and sperm in her body to lay "Goldline" honey bees. So the worker bees that I will get in my package (Italian) will care for the queen, make comb, forage for pollen and nectar, and care for the eggs and 'babies' that they queen lays. After these new 'babies' are raised, my whole hive will be Goldline Honey Bees. The original package of Italian bees will have passed away. Amazing, eh? Read about Goldline Honey Bees here. Some folks who either have them, or have heard about them made these remarks:
"Ordered a Goldline queen today from Purvis Brothers Apiaries. Ive heard nothing but good about the Goldline queen. I asked what the temperate and they said good, usually hat and vail, sometimes nothing."
"I set up 3 nucs w/ them and a few members really like their queens. I wintered in one deep w/ medium of honey on top. So far all three are alive and well. Docile so far. Cant asses their forgaing skill yet. They do exhibit "uber-hygienic" behaviour as compared to my Minn Hygienics set-ups. They start to clean up even before my inspection is over. Carry the dead dozens of feet away instead of just pushing off landing board."
"I have had PBA Queens for 4 years and have raised some from them, they are very good queens, good foragers, big hives, very good temperament, I work mine without smoke and some days they can be irritable without smoke but they are good bee's."
"They are some good bee's, build up fast and large, good honey producers."
Sounds good, right? Let's hope!
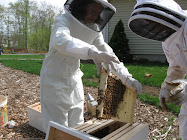
I started painting my hives yesterday in our sunny 60 degree weather. Wonderful. This is just the primer coat. A girlfriend of mine (and fellow beekeeper) said that she used Glidden primer and topcoat paint and hasn't had to repaint hers yet, after 4 years. That sounded like a good recommendation to me. All beekeepers say "Don't wait until the last minute to paint your hives and put in your foundation (see later picture)." Invariably, people are scrambling to get everything done just as the bees arrive. I decided to heed their advice ... although I tend to be a "last minute gal" by nature. Incidentally, you only paint the outside of the hive. You don't paint inside where the bees live. The paint is to preserve the wood.

I gave my boys the job of collecting pine needles for my smoker, to make sure they are good and dry by the time I need them. Before I get my bees I'll have to practice. You don't want to have a smoker debacle on the first day you go to work your bees.

Here are my frames relaxing in our stuffed chair. They look comfy, don't they? Putting in your foundation is actually a lot more labor intensive than you'd think. Most frugal bee keepers make their own frames which come in pieces like a kit that you have to glue and then hammer together. As I mentioned in my last post, I decided that would be more than I could handle at this point. Next time. I promise.

So, foundation is a flat surface that is embossed with a comb shape on which the bees will build their comb. Our bee club worked together to come up with standards and instructions for the new-bees (like me) that would give us the best understanding and best opportunity for success. I think they also lean towards tradition. There are apparently many strong opinions among bee keepers. This is in part because it's really kind of an "art". And it's personal. What works for me and my bees, just may not work for you and yours. In any case, the bee club decided that the best thing for us to use was wax foundation (which is a thin piece of beeswax embossed with a honey comb shape) with wire (for strength and stability, particularly when you go to extract honey) crimp wire (or hangers) and support pins. Which all work together to make the foundation stay nice and firm within the frame. Plastic 'foundation' is becoming increasingly popular because it's basically labor free. The frames and foundation are one piece of hard plastic. You just plunk them into the hive. But the bees don't like it as well, and you know how I feel about plastic! Yeck. Anyway, I am happy to go through the extra effort to provide my bees with wax foundation. I sure don't want to live in a plastic house, I'm not going to make my bees live in one either.
It is a bit labor intensive. First you have to cut out with a utility knife a thin strip of wood under which the crimp wire (or hangers) will lay. You insert the foundation, then you have to nail the strip of wood back in place on top of the crimp wire hangers. See the four nails along the bottom? The tricky part is tapping the nails in without cracking the wax foundation.

Support pins are then inserted to support the foundation along each side.

Last night I worked on them while I treated the boys to a movie (Victor has been traveling on business) with the understanding that they wouldn't complain when I pounded nails periodically. In all that time, I only finished 8 frames. Benjamin promptly put his foot through one. Good grief.


No comments:
Post a Comment